If you’re like me, you’re all about low maintenance desserts. I don’t blame you. I love this mixed berry galette recipe. It needs just 15 minutes to prep, so it makes for a perfect BBQ dessert with little effort. I use strawberries, raspberries and blueberries. Oh, and there’s two little secrets to get the perfect flaky crust and delicious filling! Let’s jump in!
This post contains helpful tips and tricks! If you’re in a rush, please use the “Jump to Recipe” above!
💭Why you’ll love this recipe
Let’s face it, we’ve all been in a rush and needed to get a quick dessert on the table.
- Only 15 minutes prep time – You can use premade pie crust or storebought pie crust (whatever is easiest for you) and it only takes 15 minutes of active work
- Uses fresh or frozen berries – I love using fresh berries in the summer, but the good news is that this recipe works just as well with frozen berries too
- Easily customizable – you can adjust the sweetness, flakiness, and filling ratio to make this recipe how you’d best like your galette!
📋 Ingredients & tips
A galette is a free form pie typically made with some type of fruit. I love summer because we get all sorts of berries. Here in the Northwest, we get strawberries, blueberries, raspberries everywhere, so I’ve used all of them here.
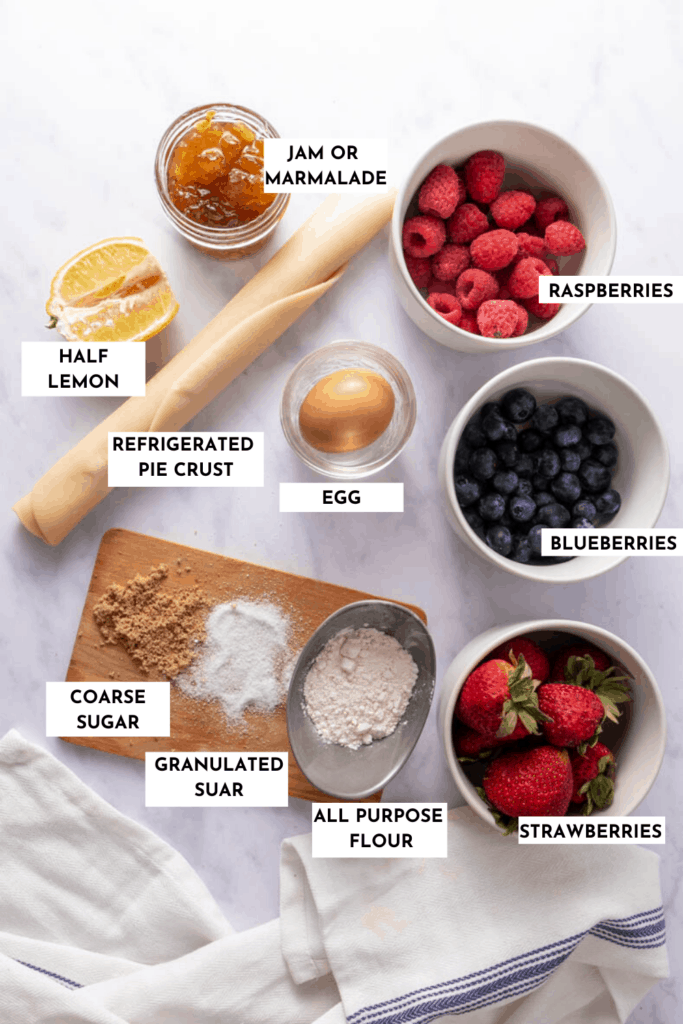
Pie crust: you can either use a storebought crust or you can make one from scratch. But I wanted an easy recipe so you make it on a moment’s notice if someone invited you to a BBQ now (or if you’re like me and forget dessert for Thanksgiving). I’ve used storebought pie crust (Trader Joe’s brand). You can find these next to the dairy section, refrigerated or frozen. Please note that some of the popular brands tend to use lard, which is not vegetarian. Trader Joe’s is vegetarian but not vegan while Marie Callender’s and Wholly Wholesome are both vegan.
Berries: I’ve used a mix of 1/2 cup each strawberries, blueberries and raspberries. You can make the recipe with all of them, you can make it with just one of them. Oh, blackberries, apples, peaches and even cherries could work with this dessert (what a wildcard!)
You can use frozen or fresh berries (I prefer fresh berries in the summer). No need to thaw the berries if you’re using the frozen version either. Just pop them straight in.
Secret Ingredient, Jam: When you just add a bunch of berries to the pie crust, they tend to sweat out while baking. This typically ends up in a soupy mess (I’ve had to scoop them back out to make jam). Then, one day, I thought, what if I just added the jam to the base? And oh boy, it worked so beautifully.
Secret Ingredient 2, Egg Wash: This is what takes storebought crust to the next level. I whisk an egg together. Then, once I’ve folded the pie edges, I brush the tops with the egg wash. Then, I sprinkle a bit of coarse sugar on the edges to give it a bit more oomph. Never fails to impress!
Secret Ingredient 3, Flaky Sea Salt: When I take the galette out of the oven, I almost always sprinkle some flaky sea salt (like Maldon’s) on the crust. I can’t even begin to describe how much it transforms the taste! It adds a much needed note of saltiness!
Note: I’ve found spices tend to work with some of the other fruits, but not necessarily with berry galettes, so I don’t use any spices or seasonings in my galette. But you can add those in if you prefer a bit of a kick (for instance, some cinnamon or nutmeg with apples or cardamom with peaches).
👩🏽🍳 How do you make a berry galette from scratch?
I love the rustic nature of the galette – you don’t need a ton of “folding” experience, and it tastes just as delicious when it comes out of the oven.
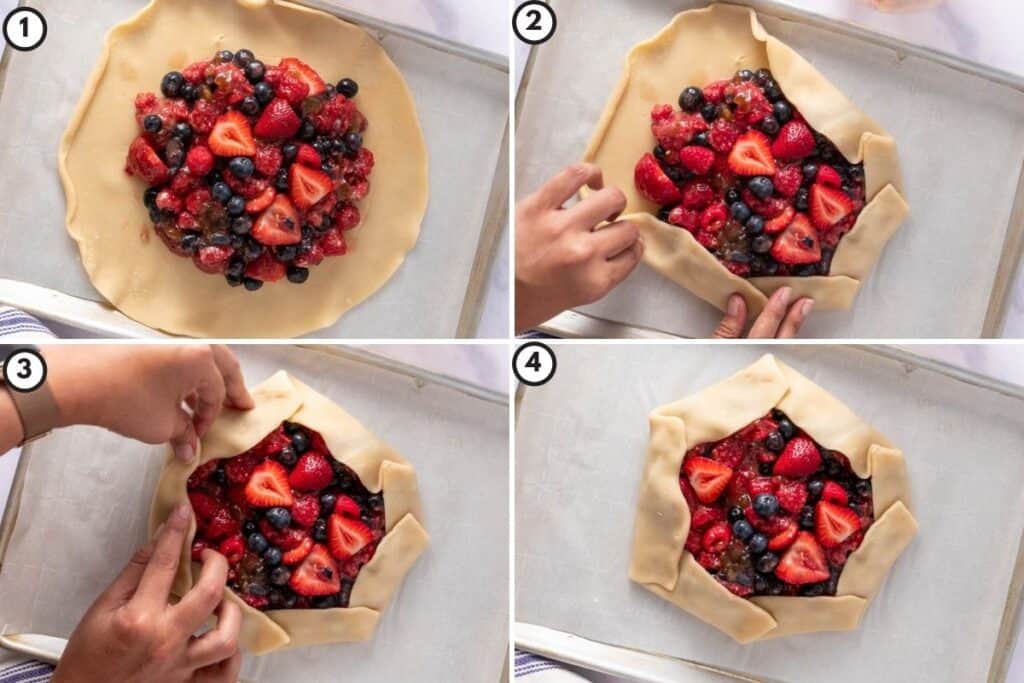
Prepare the berry filling and fold the galette
To prepare the filling, I add granulated sugar (with some Turbinado but any sugar would do), and a small squeeze of lemon juice. You can add vanilla extract to give it a nice nutty flavor and toss them together. Then, add flour and toss them to give them some structure.
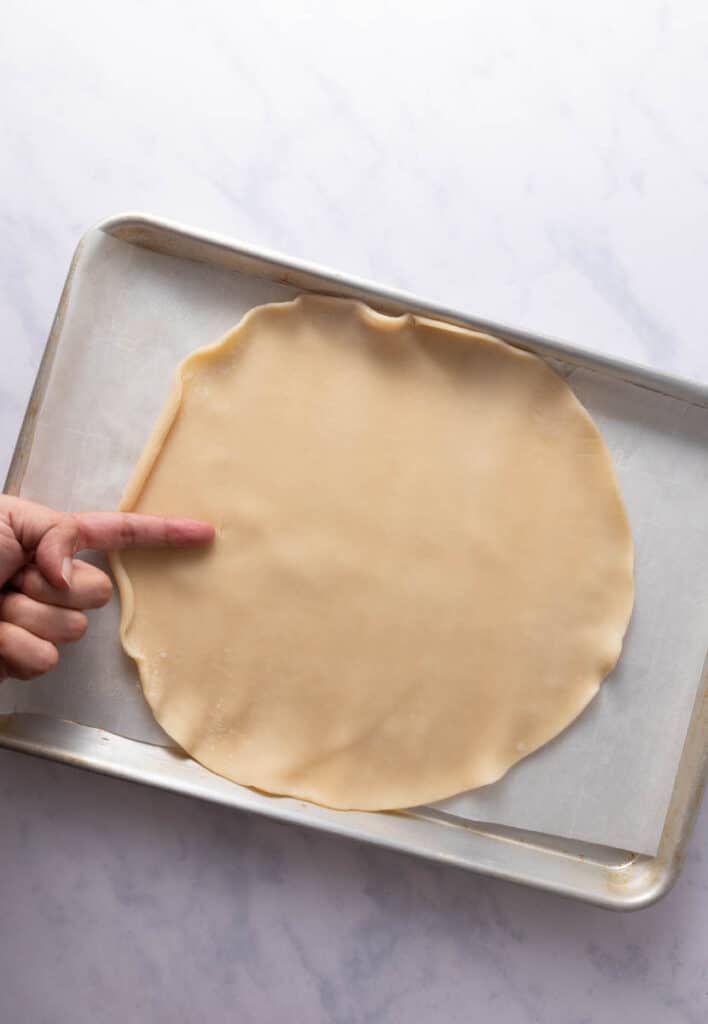
You’ll want to leave about 2″ of space on all sides to ensure that there’s enough pie crust to fold over. 2″ is roughly the length to the second joint of your index finger (see below)
Fold the corners in, pinching occasionally to create the galette
Brush the folded galette with egg wash
Once the galette is folded, I typically brush it with egg wash to encourage the golden brown you see on perfect, rustic galettes. I also sprinkle some sugar on the crust to get that crisp texture – you can even add almonds!

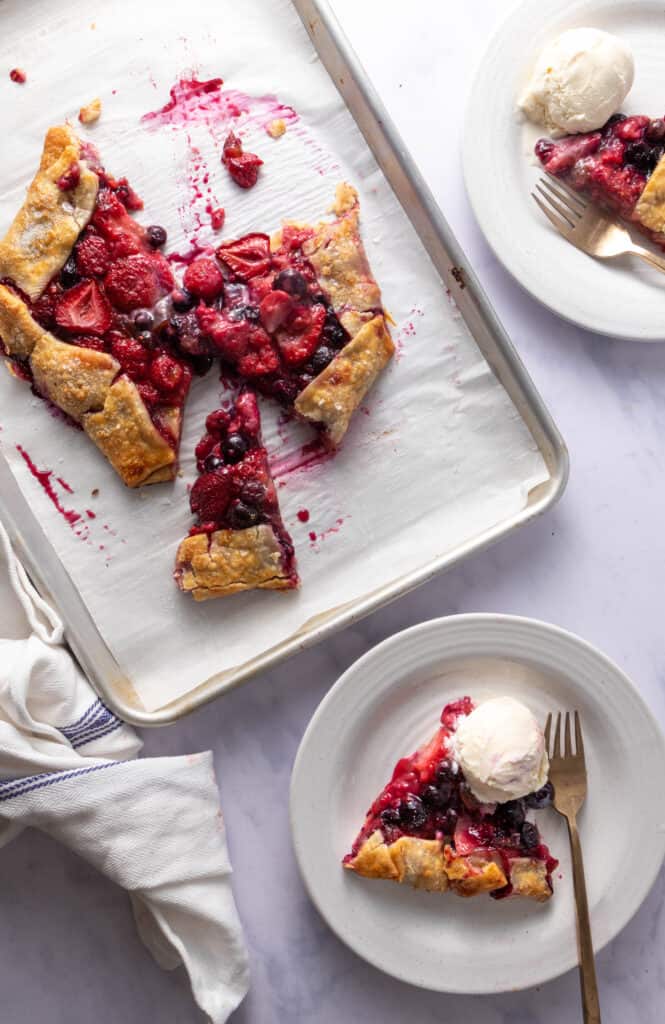
🍴 Serving & storage suggestions
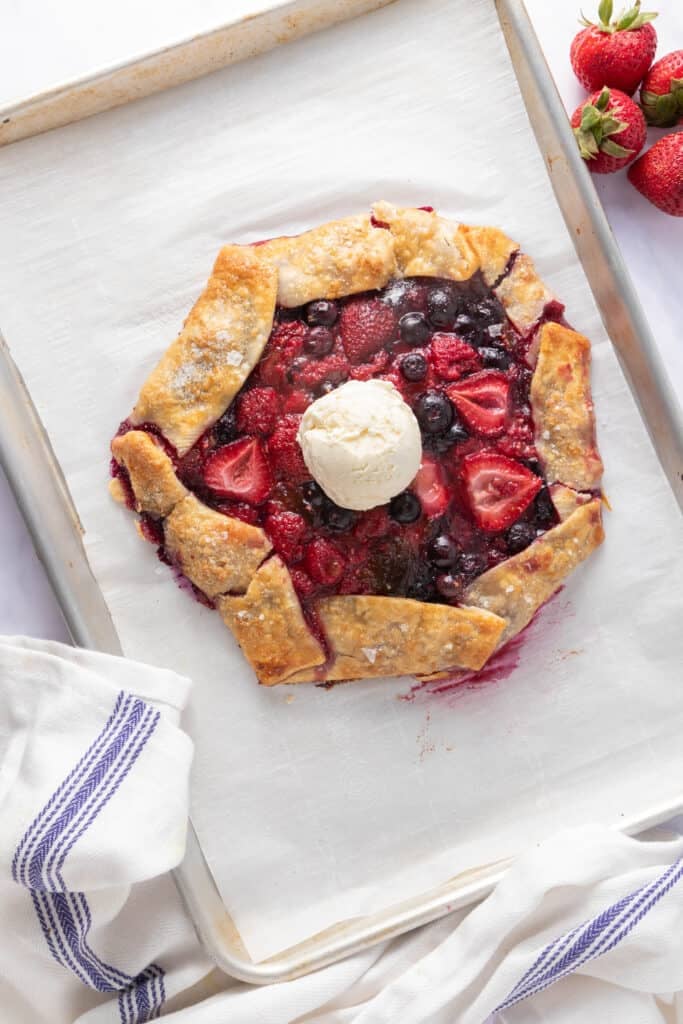
I love to serve this summer berry galette with a big dollop of vanilla ice cream and sometimes, a few sprigs of mint. Something about the freshness just elevates the galette to a whole new level.
This is a perfect summer dessert because you can make this easy galette hours ahead of when you need it (or you can make these delicious kitchen sink cookies). If so, transfer to a cooling rack 5 to 10 minutes after it’s done baking. Then, set the oven to warm while you’re about to start dinner or BBQ. Pop the galette in to warm up, then serve with a dollop of ice cream when you’re ready for dessert.
I try to eat this galette the day it’s made because it’s freshest then. Plus, it’s super simple to make so I suggest making it fresh when you want to eat it. You could loosely cover it with a lid and leave it in a cool place (not the fridge) at room temperature for a day or two more (but the bottom of the pie crust might end up getting soggy).

Berry Galette
Ingredients
Pie Crust
- 1 pie crust, storebought, refrigerated and rolled
- 1 egg, whisked, for egg wash
- 1 tsp granulated sugar, for dusting the crust (or Turbinado)
- 1 tsp flaky sea salt, for garnish (optional)
Galette Filling
- 1.25 cups mixed berries, plus a few more for garnish and topping; I've used strawberries, raspberries and blueberries
- 2 tbsp berry jam, any good quality jam would work
- 2 tbsp all purpose flour, can substitute with corn starch
- 1 tbsp granulated sugar , can substitute with Turbinado as well – adjust this to your preferred sweetness
- 1 tsp vanilla extract, optional
- ½ tbsp lemon juice, increase for a more tart filling
Instructions
- Preheat the oven to 375°F and line a baking sheet with parchment paper or silicon mat (I prefer parchment paper)
- Wash berries thoroughly and pat dry to remove excess water. Add fruits, jam, flour, sugar, vanilla extract and lemon juice to a mixing bowl and stir to combine well.
- Take the pie crust from the package, and unroll it on a baking sheet lined with parchment paper (or a silicon mat)
- Transfer the filling to the center of the pie crust. Make sure to leave about 2" along the circumference (this is where you'll fold the galette) – 2" is roughly the space up to the second joint of your index finger!
- Fold the crust over the fruit, pleating every couple of inches (see post for visual instructions)
- Whisk an egg in a bowl, and brush the folded crust with this eggwash – then sprinkle the coarse sugar on top of the crust
- Bake the galette in the oven for about 30 minutes (up to 40 minutes depending on your oven) – start checking at the 20 minute mark, and watch for the fruit bubbling, and a golden brown crust. If you prefer to test using a fork, the crust should crackle under the fork.
- Serve with some flaky sea salt on the crust, and a nice big dollop of ice cream (optional)
Notes
- If you have a refrigerated pie crust, just let it stand at room temperature for 15 minutes before you start rolling them. If you froze your pie crust, then bring it out and leave it at room temperature for at least 90 minutes before attempting to roll. Don’t microwave them! Make sure your pie crust is vegetarian (some of them contain lard!)
- If the berry filling is still too watery after adding flour, you can add up to 1 – 2 tbsp more of all purpose flour to help thicken the mixture to the right consistency
- If you want to make ahead, transfer to a cooling rack 5-10 minutes after removing from the oven. Then, when you’re eating dinner, pop it back into a warm oven (i.e. warm setting or just residual heat) – then serve with ice cream on top.
- Frozen berries can be quite sweet sometimes, so you can also add a pinch of flaky salt into the mixture o increase the amount of lemon juice to make it less sweet.
Nutrition
Nutrition information is automatically calculated, so should only be used as an approximation.
Note: This post was originally published 27 June 2020, and updated on 21 November, 2020 with additional information on pie crusts and recipe notes


Delicious and so easy and quick to prepare.
So glad to hear that, thank you!
So quick and easy to pull together, yet so delicious!
Thank you so much! It’s my go-to quick dessert 🙂
This is the perfect summer dessert! Light but satisfying. And so pretty! Love recipes that let you create an impressive dessert without being a lot of work. And don’t leave off the finishing salt flakes – that Was genius Shruthi!
Thank you!!! I love the crunchy salt at the end to balance the dessert – so glad you liked it too!!