This is my great grandmother’s kitchari recipe – an Ayurvedic comfort food I return to again and again—especially when I want something grounding, warm, and healing. It’s like a hug in a bowl, but with turmeric, cumin, and soul. It’s vegan, gluten-free, nutrient-rich, follows traditional Ayurvedic principles, is made in one pot, and a great savory “cleanse” meal to add to your list of go-to foods for eating clean!
This post contains helpful tips and tricks! If you’re in a rush, please use the “Jump to Recipe” above!
Origin Story
Growing up in South India, my mother had a sixth sense for when a storm was rolling in, and she’d start dry-roasting moong dal before the first drop even hit the ground. The kitchen would fill with this earthy, nutty aroma, and that was our cue: it was kitchari night.
This wasn’t just food; it was ritual. The pressure cooker would sputter, the cumin seeds would dance in hot coconut oil, and I’d hover close by, sneaking a taste of parboiled carrots or picking out the perfect coriander leaves for garnish. I didn’t realize it back then, but this simple, golden porridge was more than dinner—it was medicine, memory, and mom’s love all in one bowl. Pure nourishment.
The version I make today is deeply rooted in those memories. It’s also adapted for real life: flexible for busy weekdays, gentle enough for reset days, and forgiving enough that even if you’re not following Ayurvedic principles to the letter, you’ll still walk away nourished. This is more than a recipe—it’s my family’s story, and I’m honored to share it with you.

Ingredients and why they matter
This kitchari recipe was passed down from my grandmother. I only use ingredients that follow Ayurvedic principles. I do not use additives like onion or garlic (which remove some of the Ayurvedic properties) but you can add these if you wish.
You’ll need mung dal (or moong dal), basmati rice, coconut oil, vegetables of your choice, and a few basic Indian spices (mustard seeds, cumin seeds, ground turmeric, ground coriander, and fresh ginger) to make this dish. I use fresh cilantro as garnish.
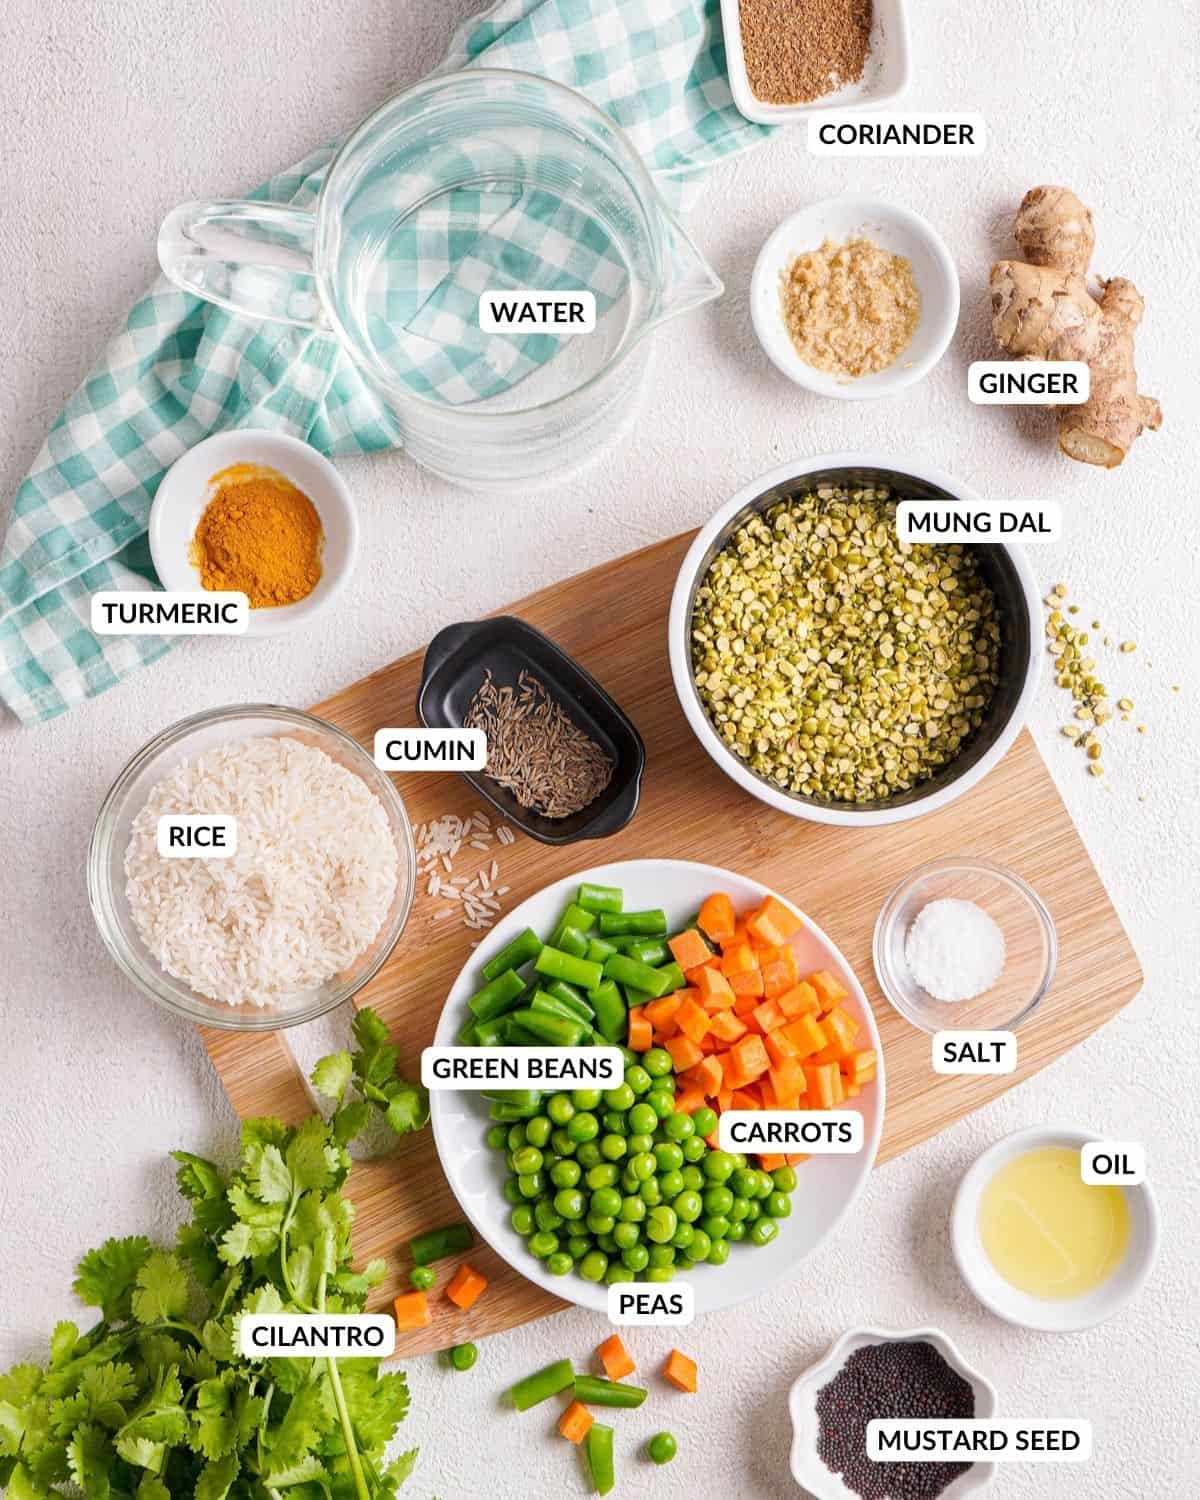
- Moong dal (split mung beans): This is the real MVP. It’s super easy to digest, packed with plant-based protein, and cooks down into that creamy, porridge-y texture kitchari is known for. You can get these at the Indian grocery store. In ap inch, you can use red lentils, but moong dal is ideal for the Ayurvedic benefits.
- Basmati rice: Light, aromatic, and quick to cook. Basmati balances the richness of the dal and helps keep the dish easy on the gut. It’s also tridoshic (meaning it balances all body types). Want to switch it up? Try quinoa, brown rice, or even amaranth—just know the texture will change a bit.
- Coconut oil (or ghee): I love using coconut oil here because it adds a subtle sweetness and keeps things cooling and calm. Ghee is also traditional and works beautifully, especially if you’re not strictly vegan.
- Turmeric, whole cumin seeds, mustard seeds, coriander powder, and ginger: These spices work together to wake up the digestive system, reduce inflammation, and give the dish its unmistakable depth. The trick is blooming them in oil first to release their essential oils. You can also add black pepper, fenugreek seeds, hing (also called asafoetida) or fennel seeds for more flavor if you wish.
- Veggies of your choice: I use whatever’s on hand—carrots, peas, zucchini, even spinach. Just steer clear of raw cruciferous veg or heavy nightshades if you’re making this for a true Ayurvedic cleanse. Bonus: frozen veggies work great too!
How to make kitchari
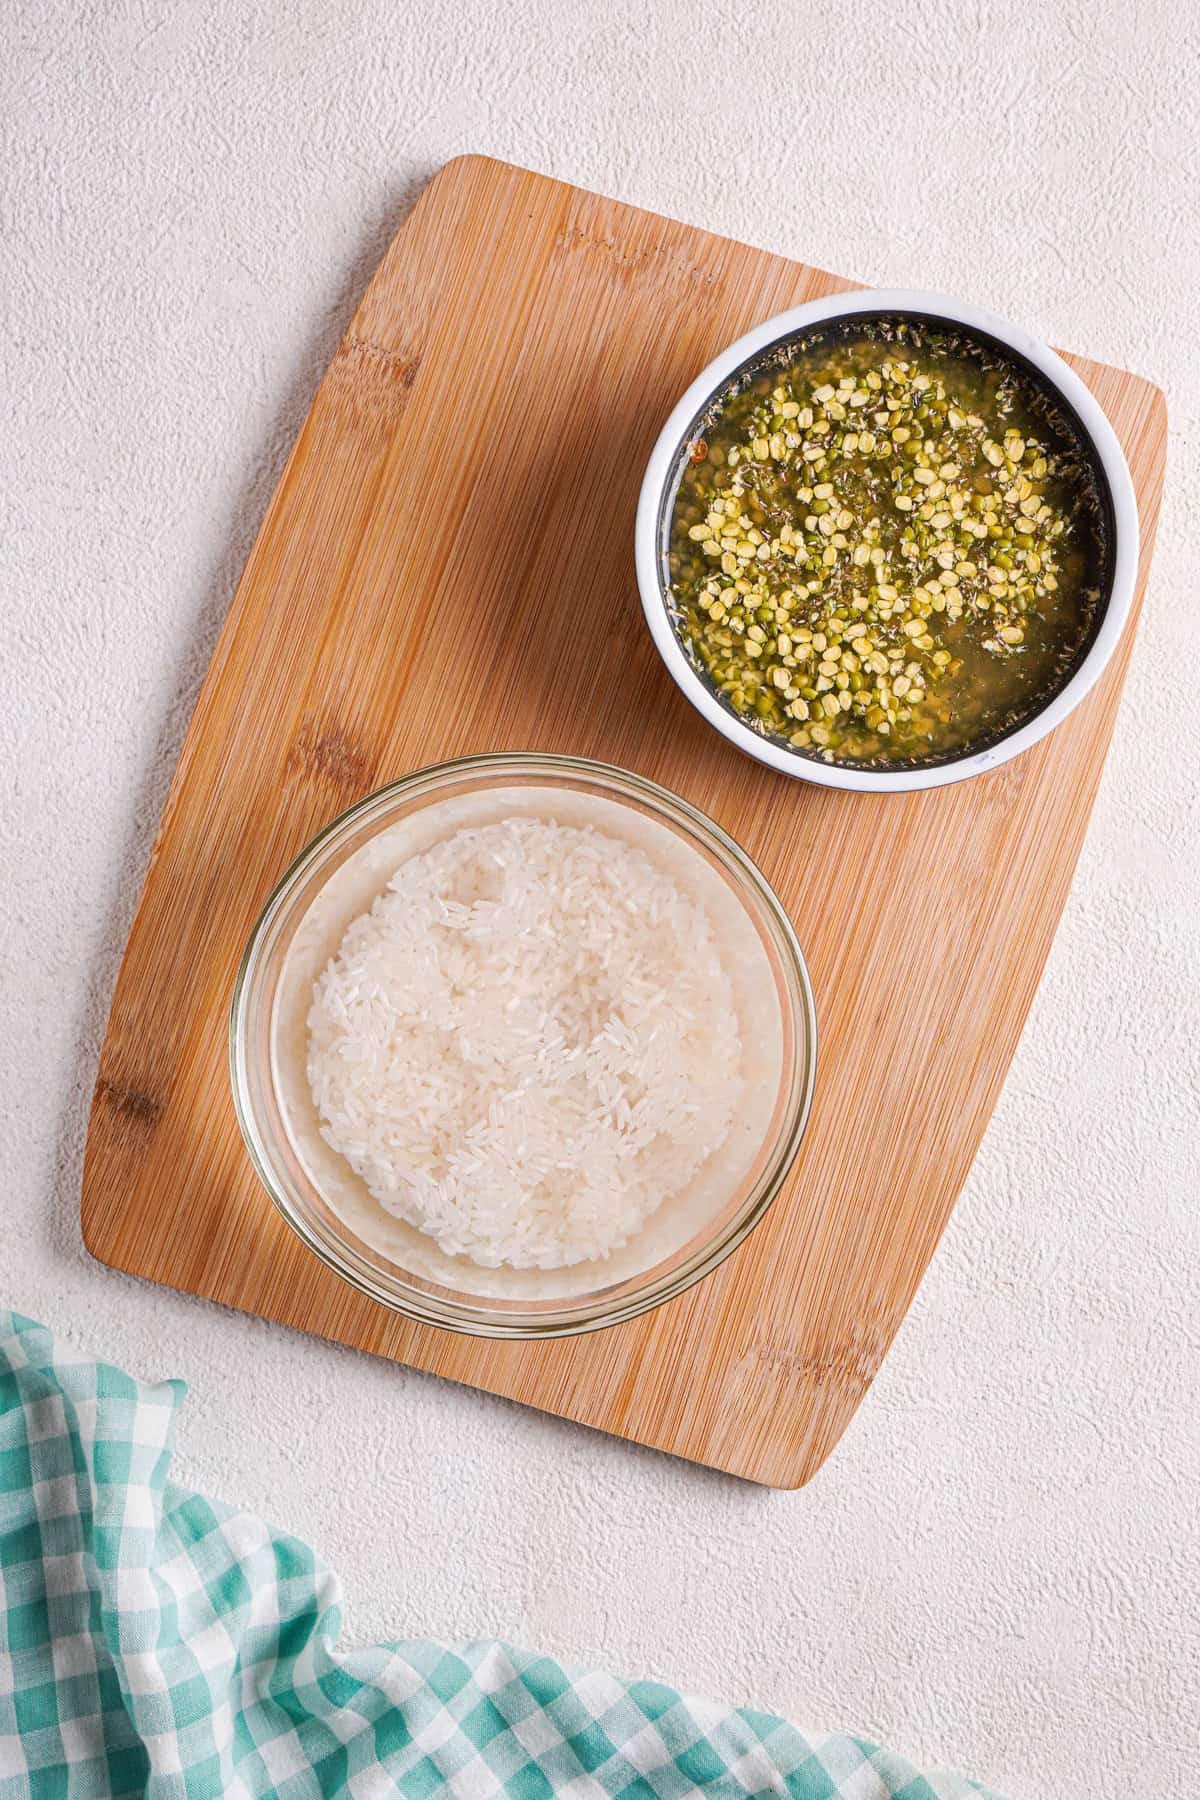
Sift through the rice and lentils with your hands to see if there are any minor impurities in there, then wash both rice and my mung dal separately at least 2-3 times. This removes excess starch. You can also soak them if you wish.
This is especially important if you’re using a polished rice like white basmati rice. Wash until the water runs mostly clear.
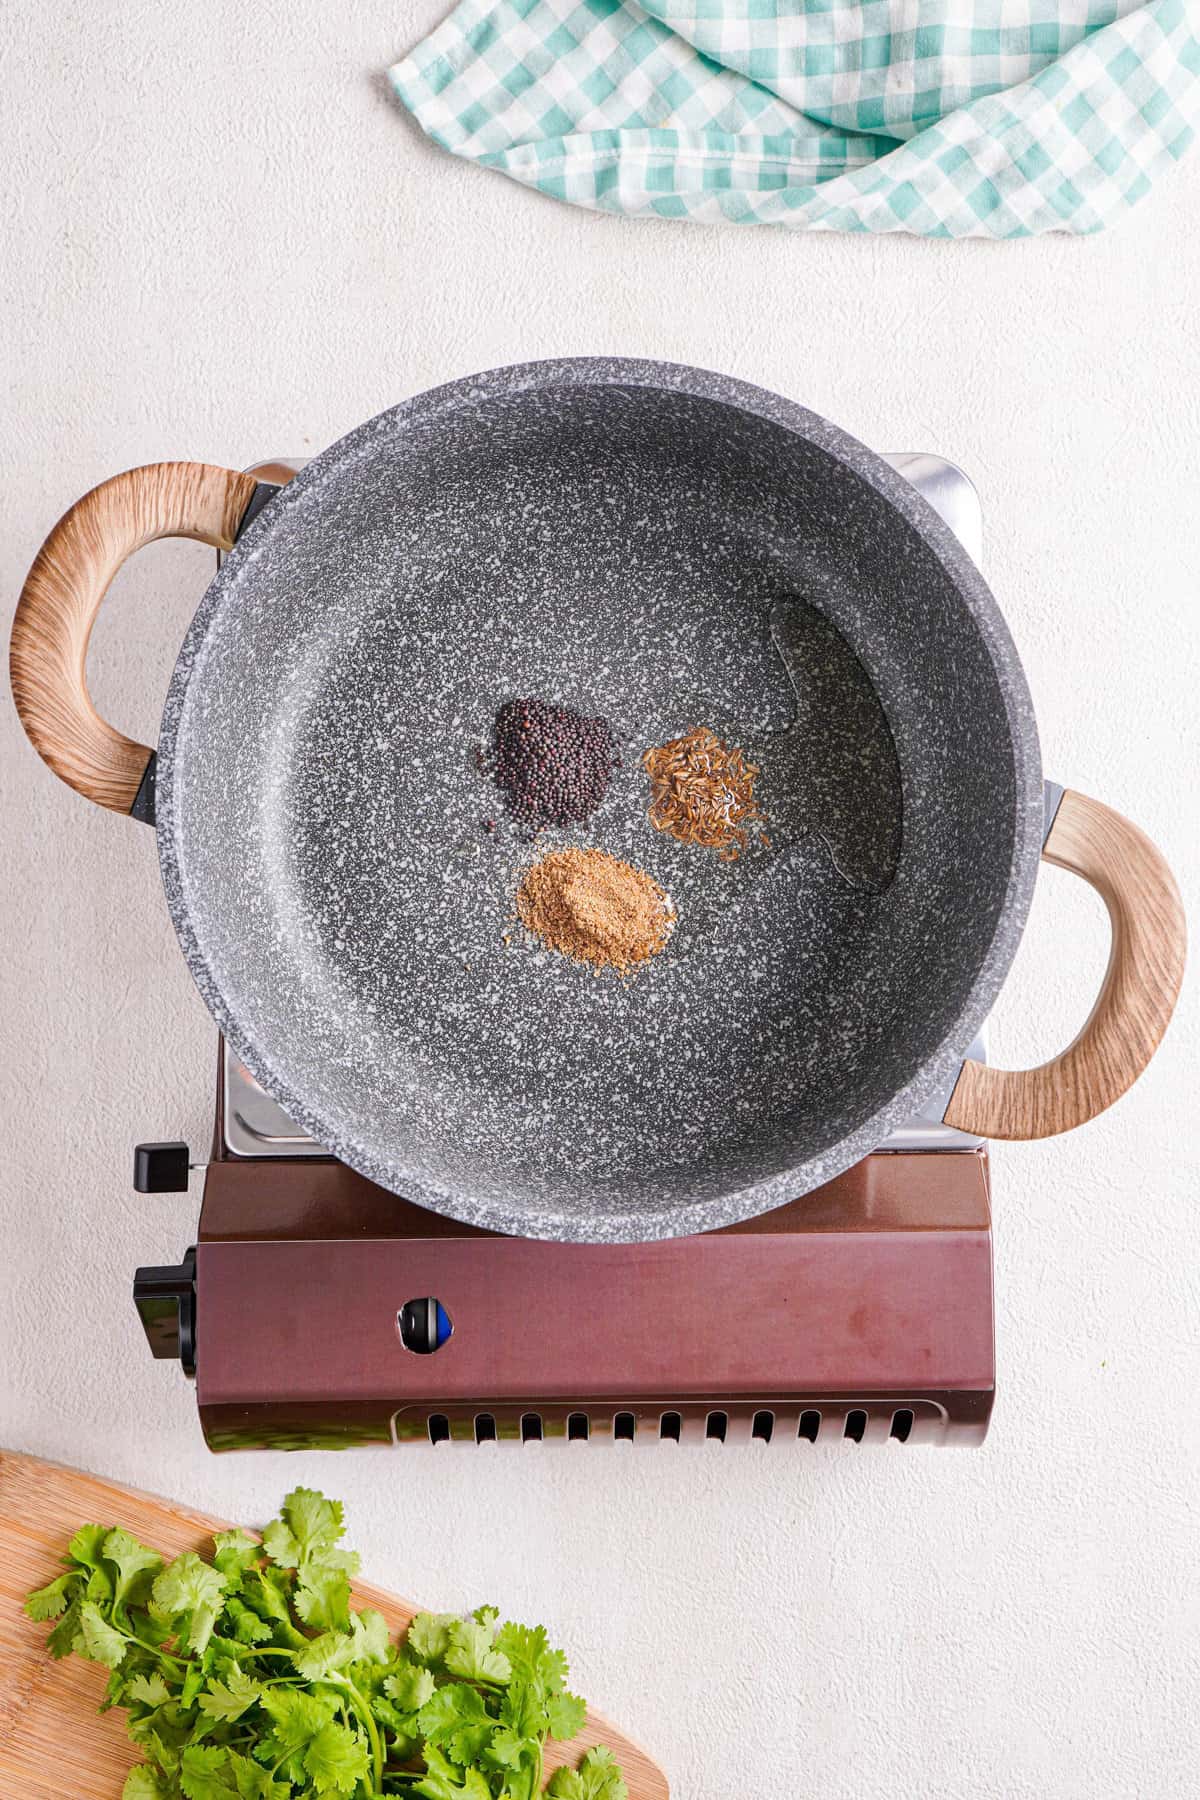
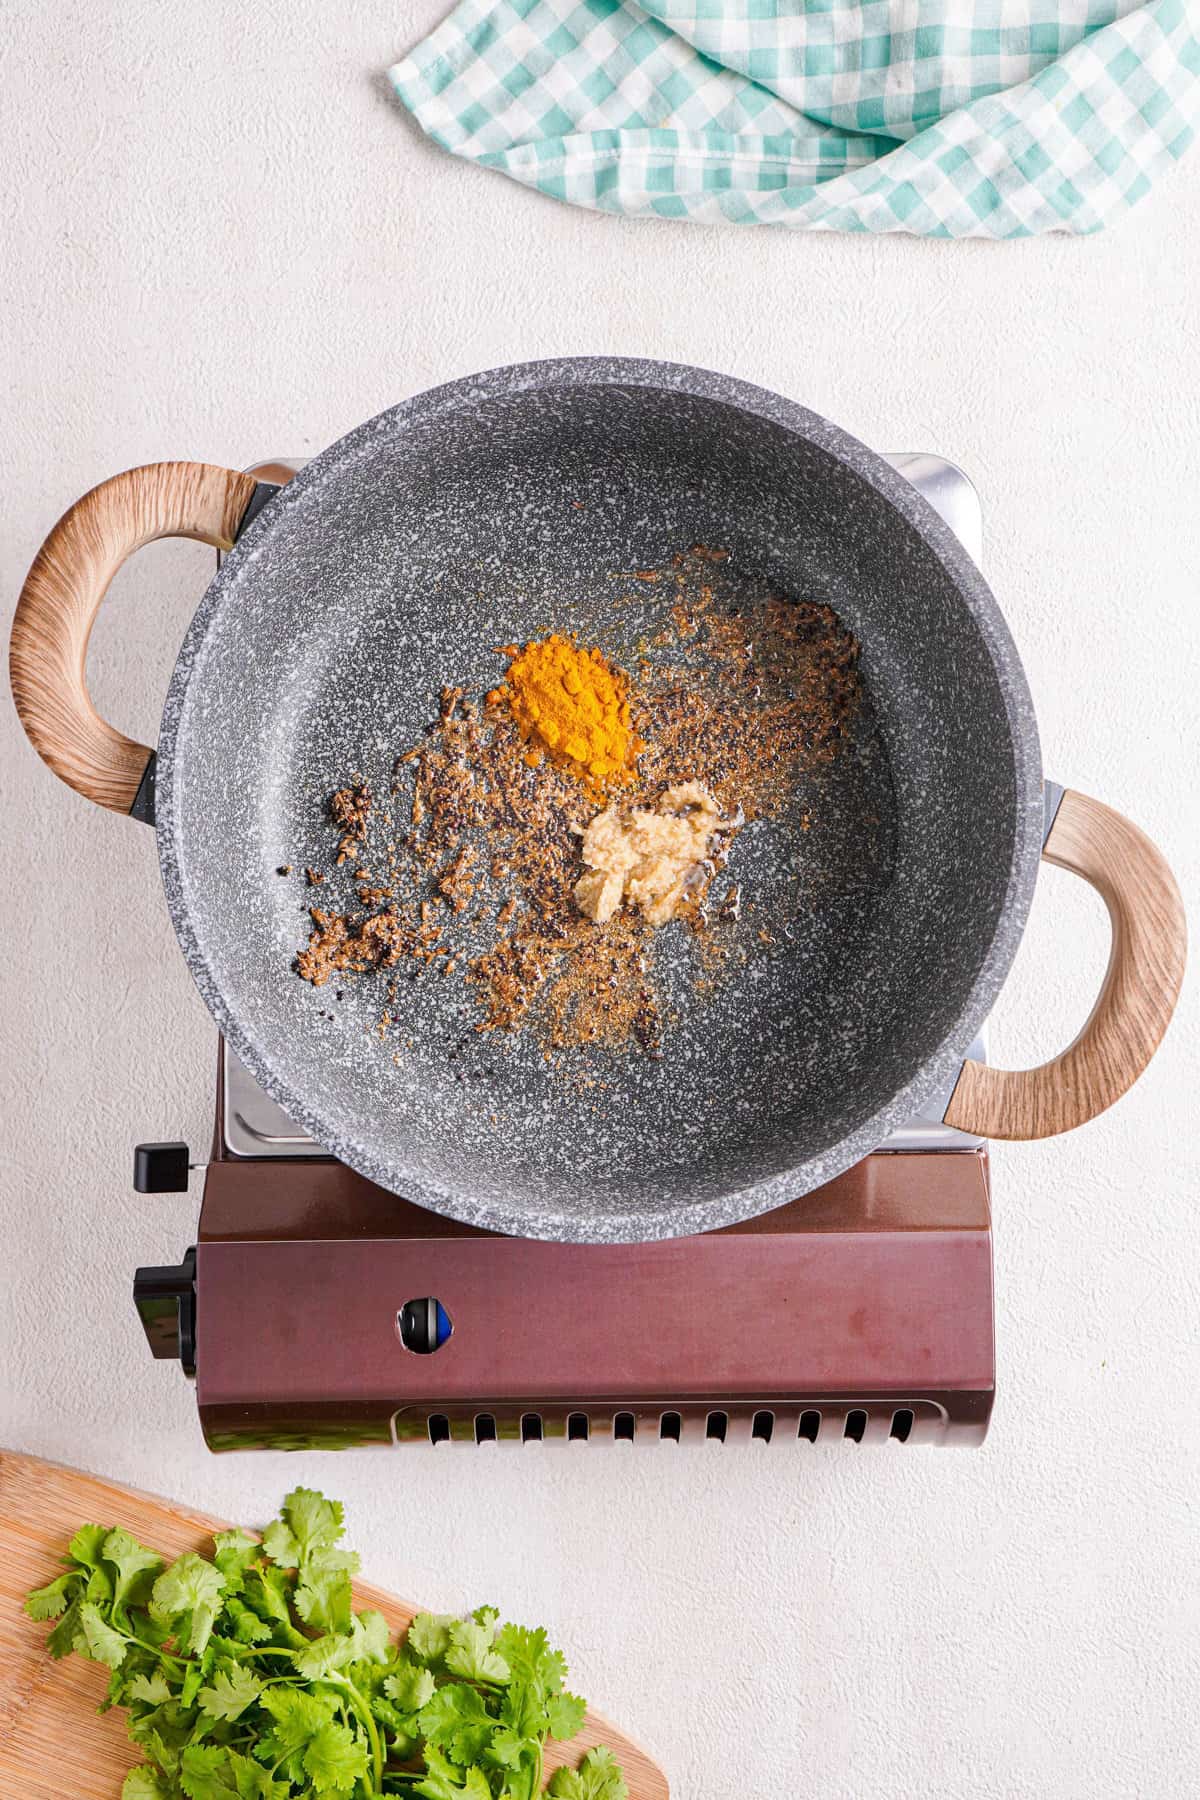
- Heat oil or a tablespoon of ghee in a large skillet or pot (with a lid) over medium heat. Then, add the mustard seeds, cumin seeds, and ground coriander to the oil and stir occasionally, until fragrant, about a minute.
- Finally, add minced ginger and turmeric and cook for about 15-20 seconds.
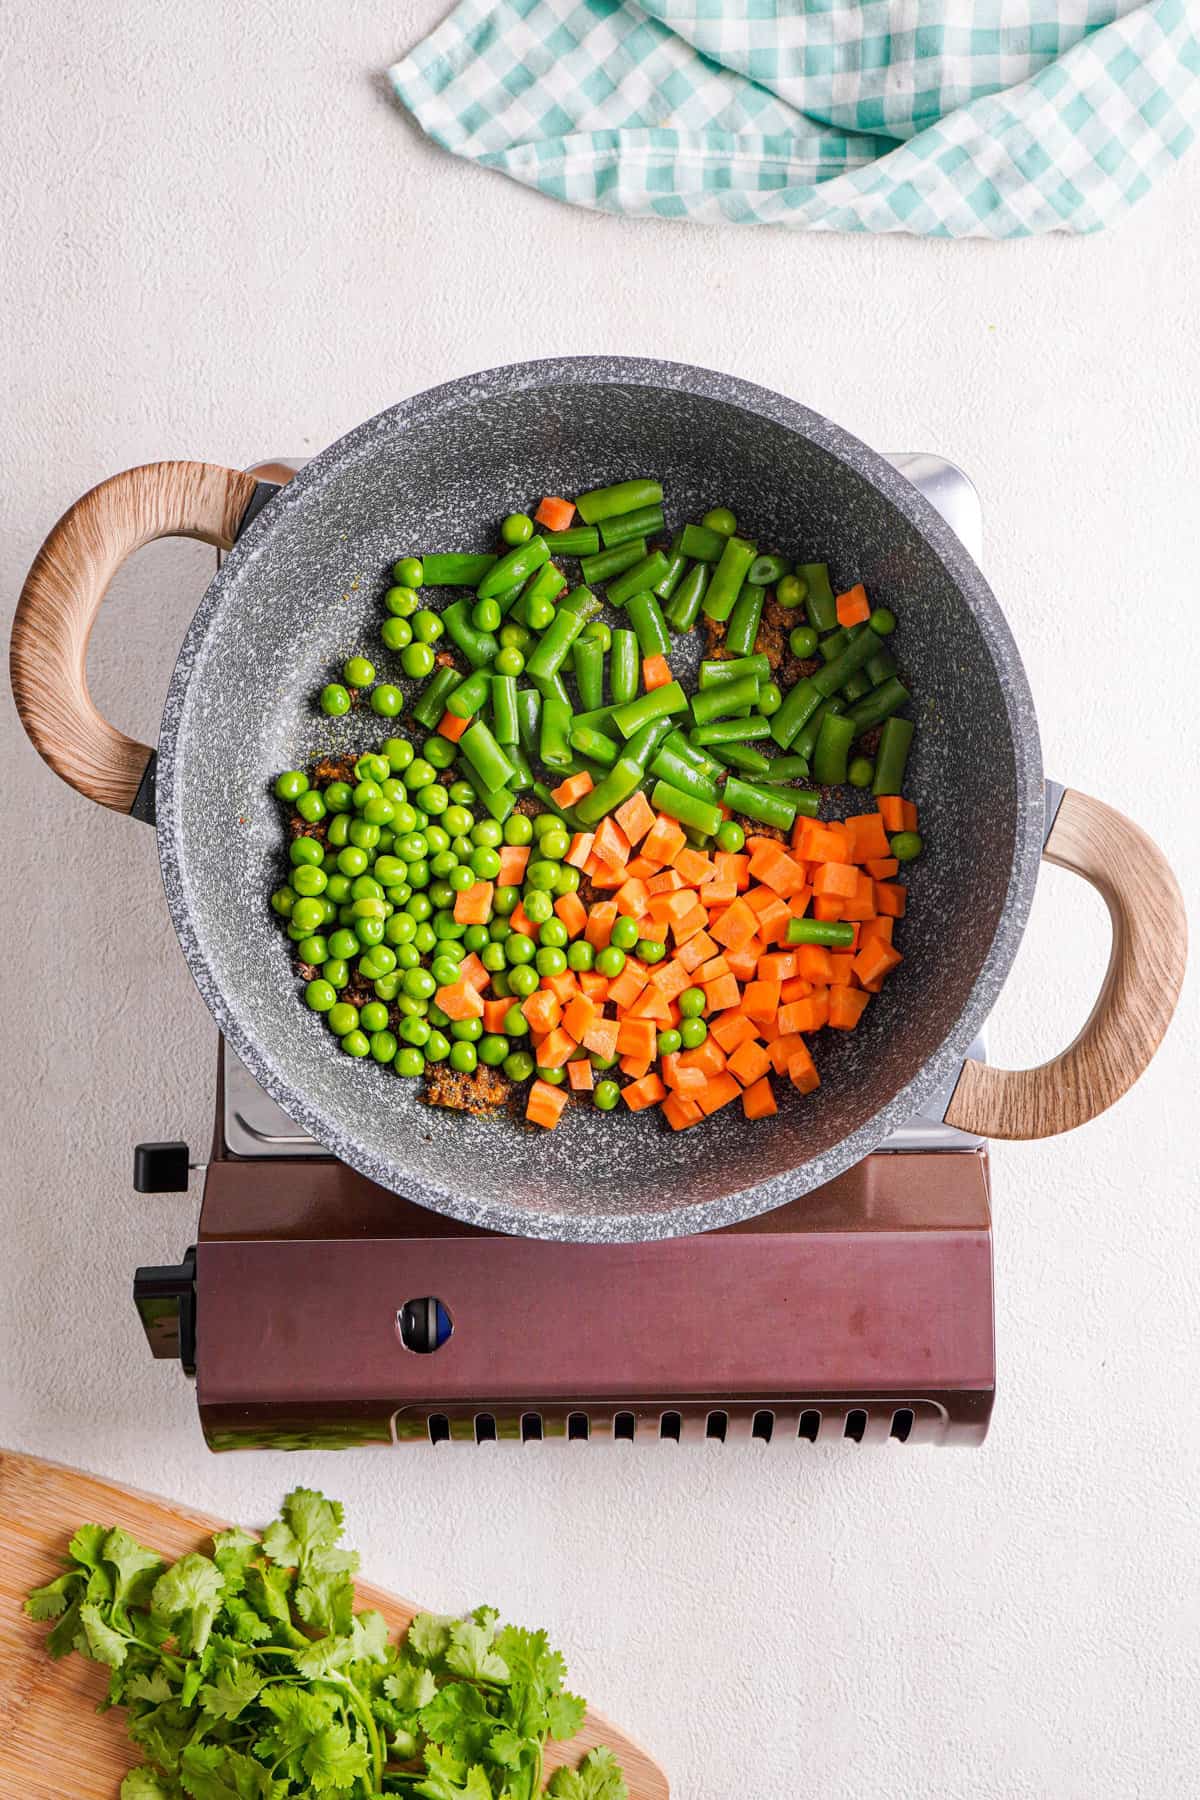
- Add the the vegetables and sauté quickly.
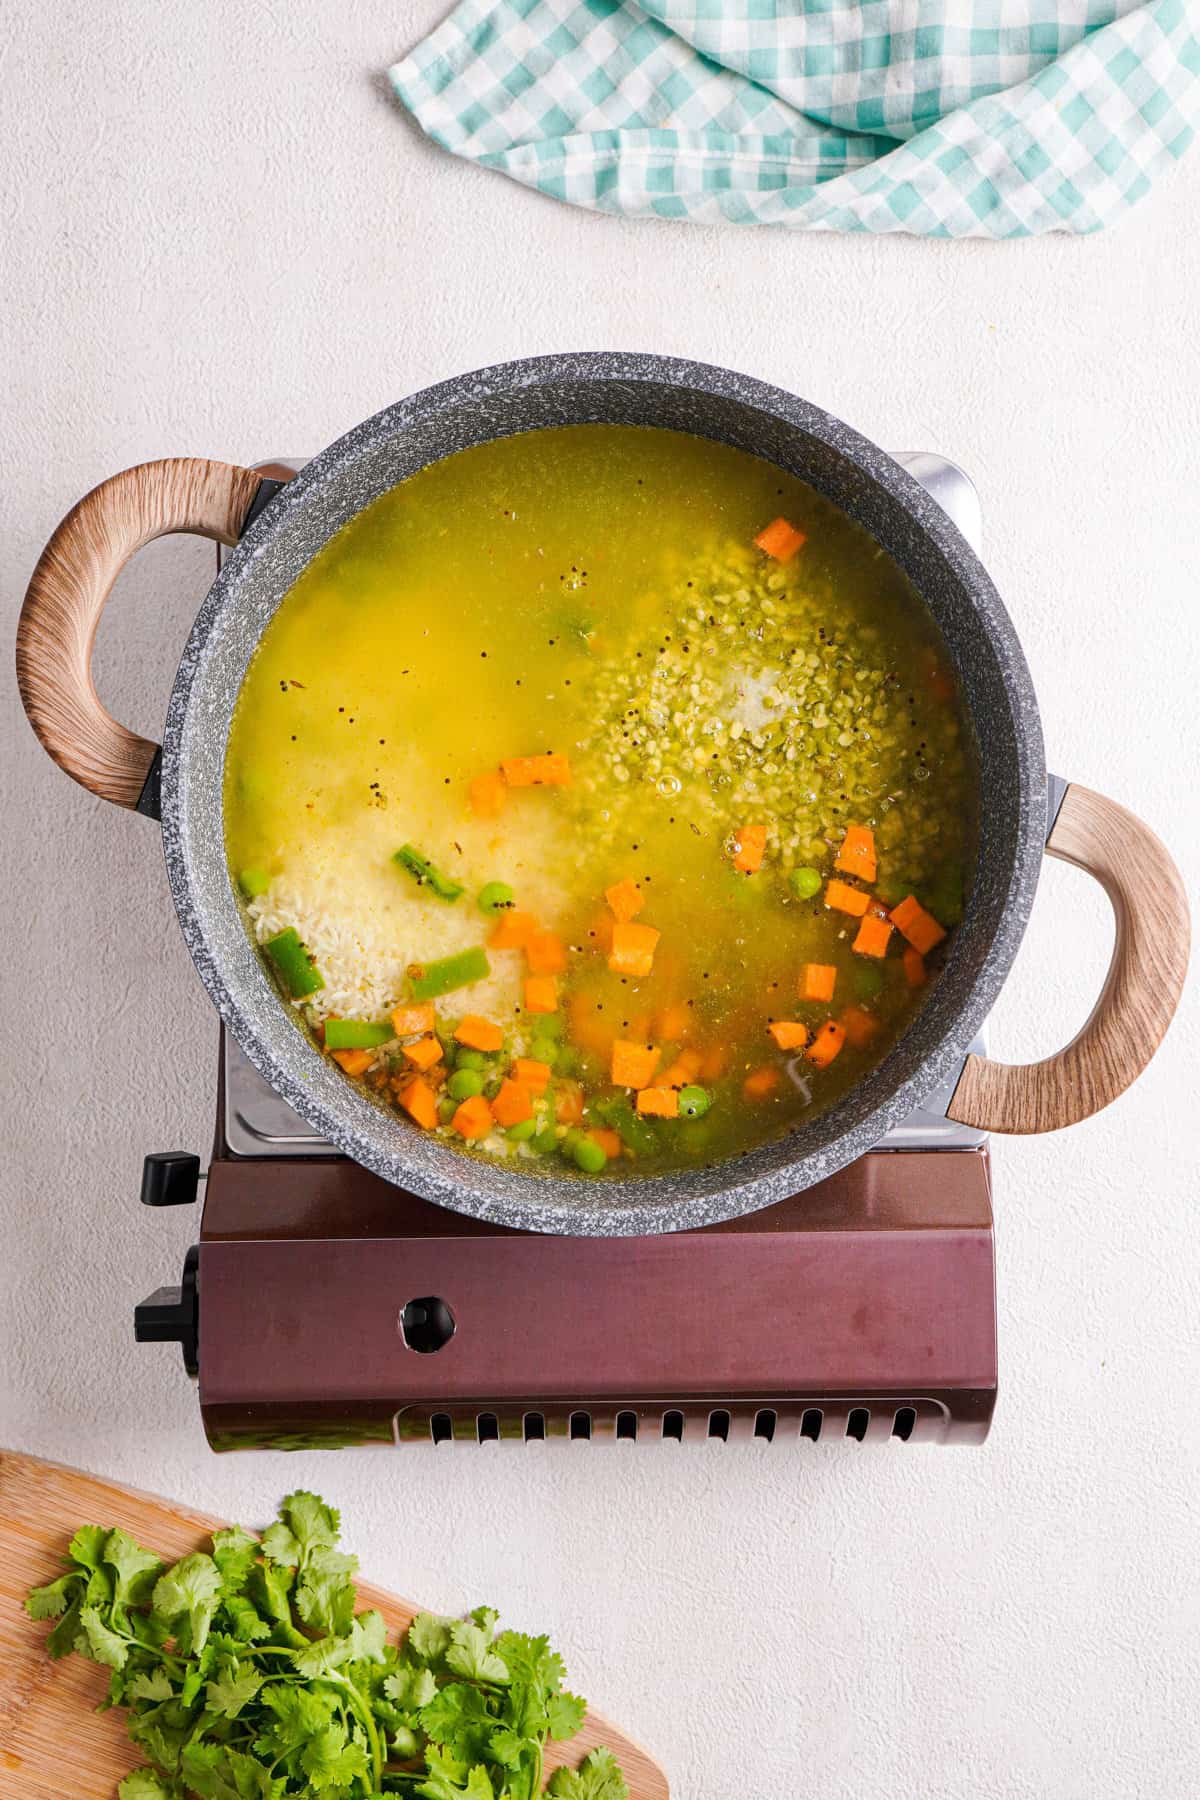
- Then, add the rice and vegetables along with water and a pinch of salt.
- Bring all of this to a boil.
- Then, reduce the heat to a simmer. Cook covered, on low heat, for about 30 minutes.


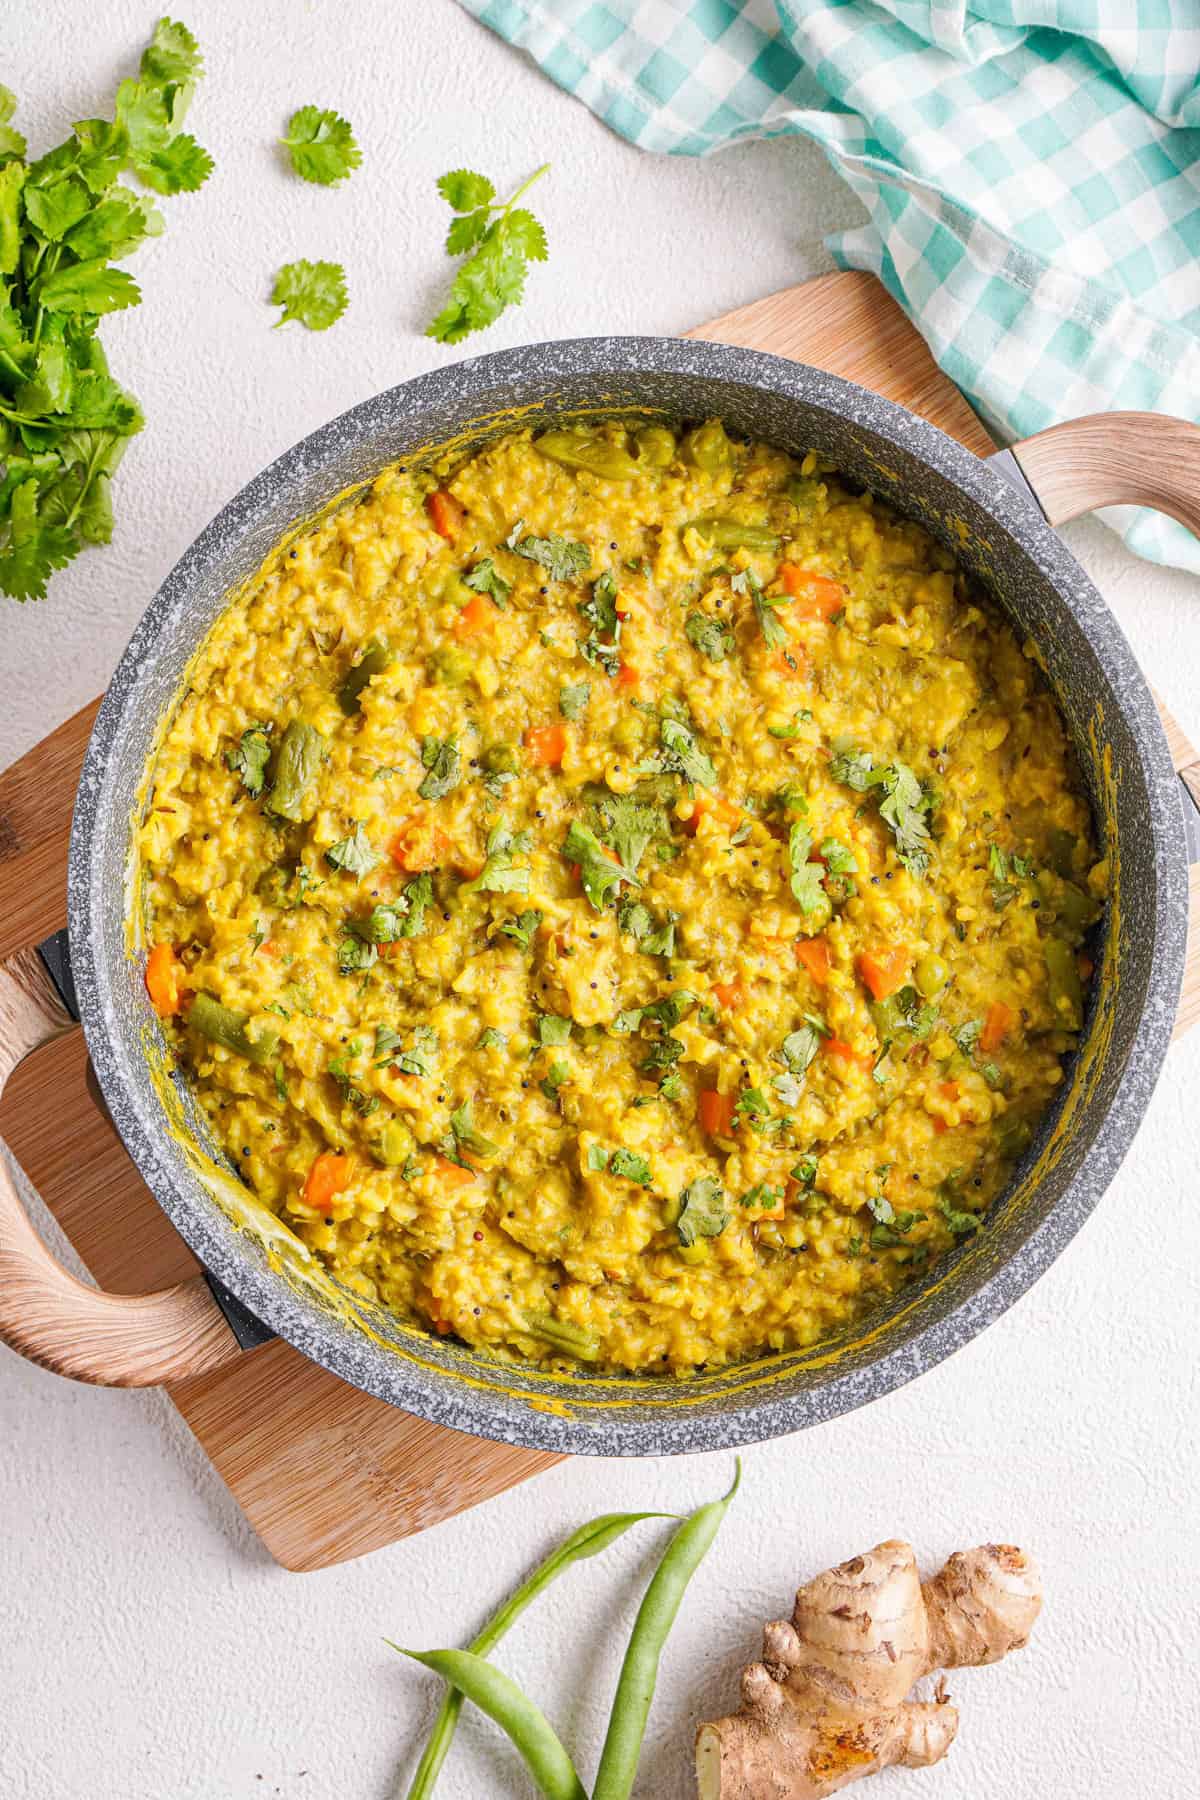
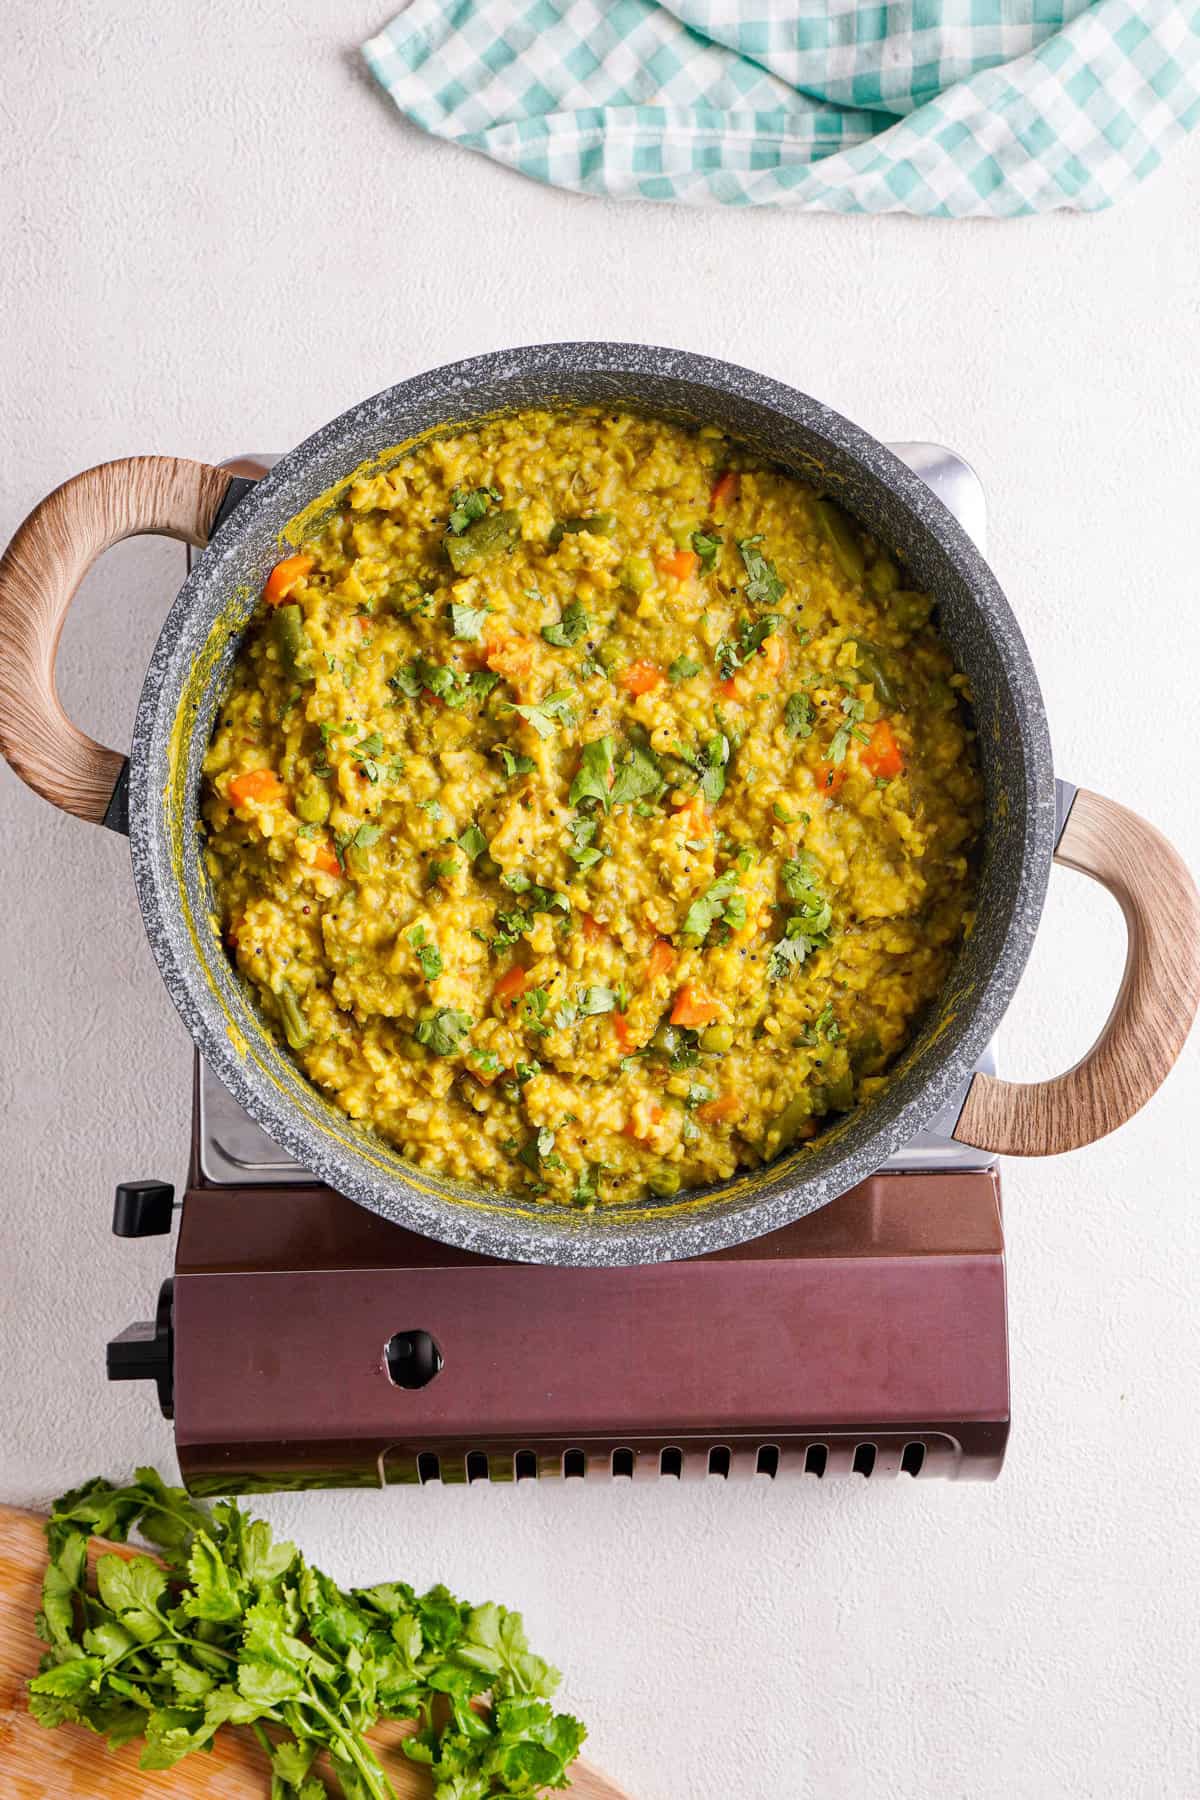
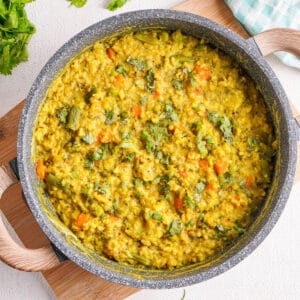
Check at the 30 minute mark to see if the rice and lentils are cooked through and the dish has a porridge like consistency. If it’s done, you can remove the dish from heat. If not, continue to cook and check in 5 minute increments until cooked. Adjust salt to your taste (if needed), and garnish with fresh cilantro. Serve hot!
This yields a kitchari that has somewhere between a risotto and porridge-like consistency. If you want something denser, reduce the water by half a cup.
How to serve kitchari
I love serving kitchari piping hot, right out of the pot, with a sprinkle of fresh cilantro on top and a little squeeze of lime for brightness. I’ll sometimes add a dollop of ghee for richness or serve it with a quick homemade chutney for a flavor punch. If you’re feeling fancy, a spoonful of coconut yogurt on the side adds a lovely cooling contrast.

Storing: This dish is so, so easy to make a large batch for convenience. From an Ayurvedic standpoint, leftovers are best eaten within 24 hours, since you’re unlikely to feel energetic, clear and balanced after a longer time. But you can store kitchari in the fridge for up to 4 days, in an airtight container (cool it to room temperature first). Then, when you’re ready to eat, just pop it in the microwave for a few.
Freezing: Allow kitchari to cool to room temperature, then store in freezer-safe bag. Portion them into individual sizes, and leave an inch of space on top since the liquids will likely expand. You can freeze it for up to 3 months!
Reheating: Thaw it first by moving to the fridge the night before, or on the counter for an hour. Then reheat on the stove or in a microwave with a damp paper towel on top.
The Kitchari Cleanse
Though kitchari has its stronghold in ancient Indian tradition, it has been made popular due to the “Kitchari Cleanse” – look, I’m not a fan of fad diets but this “cleanse” is what we did at home anytime we got sick (except, of course, we didn’t call it that).
Modern kitchari cleanses start with a week where you cut back on sugar, coffee, alcohol and other processed foods to prepare for the cleanse. Then, for a week, you consume a high fiber breakfast and kitchari for lunch and dinner, along with 8-10 glasses of water. When I’ve done this in the past, I’ve slowly weaned off kitchari over the next few days. Pretty straightforward!
If you’re interested in learning more about the Ayurvedic philosophy associated with this cleanse, and find out more about doshas, take a quiz online!

Other delicious vegan Indian recipes

Authentic Dal Tadka (Stovetop, Instant Pot)

Aloo Gobi Masala (Indian Potato and Cauliflower)

Authentic Chana Masala

Easy Cabbage Curry
Kitchari
Ingredients
- 1 tablespoon coconut oil, substitute ghee if not vegan
- 1 teaspoon mustard seeds
- 1 teaspoon cumin seeds
- 1 teaspoon ground coriander
- 1 inch fresh ginger, grated, substitute 1 teaspoon ginger paste
- 1 teaspoon ground turmeric
- 1½ cups mixed vegetables, I used beans, carrots, and peas.
- ½ cup rice, see notes
- 1 cup moong dal, substitute split mung beans
- 5 cups water, see notes for adjustment
- 1 teaspoon salt, adjust to taste
- 1 tablespoon chopped cilantro, for garnish
Instructions
- Rinse the rice and mung dal separately 2 to 3 times, until the water runs mostly clear.
- In a medium pot or deep skillet, heat the coconut oil over medium heat. Add mustard seeds (if using), cumin seeds, and ground coriander. Cook for 30 seconds, stirring often, until fragrant.
- Stir in grated ginger and turmeric, and cook for another 30 seconds. Add the mixed vegetables and cook for 1 to 2 minutes.
- Add the rinsed rice and mung dal to the pot along with 5 cups of water and 1 teaspoon salt. Bring to a boil, then reduce heat to low, cover, and simmer for about 30 minutes.
- Check the consistency (see Notes). The kitchari should be soft and porridge-like. Season to taste with more salt if needed. Garnish with chopped cilantro and serve warm.
Video
Notes
- Rice: Traditional kitchari uses non-polished rice like Sona Masoori, which is less processed and easier to digest. If unavailable, basmati rice is a good substitute.
- Consistency: This recipe yields a soft, spoonable porridge. For a thicker version, reduce the water to 4½ cups. For soupier kitchari, increase to 5½ cups. Avoid stirring too often during simmering to maintain texture.
- Vegetables: Use any mix of easy-to-digest vegetables, or leave them out for a simpler version.
- Aromatics: Ayurvedic kitchari traditionally excludes onion and garlic, but you may sauté them before adding vegetables if you prefer a more savory depth.
- Instant Pot: Sauté spices, add rice, dal, vegetables, salt, and 3½ to 4 cups water. Pressure cook on High for 8 minutes; quick release after 5 minutes.
Nutrition
Nutrition information is automatically calculated, so should only be used as an approximation.


Ive made this recipe twice over the past week as ive come down with the flu, and it is truly so simple, homely and delicious. Ive tried split moong and rice as well as split moong with white quinoa and enjoyed both versions throughly. I also opted to add in fennel seeds as well as two cloves of garlic and it perfectly suited my tastes. Thank you for sharing this great recipe!
So glad to hear! 🙂
I am looking forward to making this recipe though I need to acquire a few of the spices. In the mean time would it be acceptable to use ground cumin and ground mustard seed? If so what would you recommend on the quantities?
Yes absolutely! I would use a minimal amount of the mustard though since it can be overpowering (or you can skip!)
I tried this dish for the first time last week (the wife of my kundalini yoga teacher made it), and it was delicious. I immediately googled the recipe and here you are 😊I look forward to making it.
Thank you for the recipe. I’ve made it a few times now. Everyone loves it. Question. Can I use frozen veggies? I generally buy fresh but I was gifted some frozen veggies and want to use them up. I have sweet potato, cauliflowers flower and peas. Thank you
Yes, you can absolutely use frozen veggies!
Excellent!! It’s delicious. Thank you!! I love the flavor & simplicity! I used kale, zucchini & carrots and cooked in the Insta Pot. I already went back to the store to stock up spices for another batch. Thank you so much for the recipe & inspiration!
Hi , this is a great recipe but calls for way too much water. Comes out watery every time & I even used less water than it states.
A friend served this to me but also offered optional toppings I could add: lime juice, coconut aminos (vegan soy sauce), and shredded coconut. Is this traditional?
Hi! Traditionally, we don’t use acids / fats that way because it’s meant to follow Ayurvedic principles, but that said, the toppings all sound delicious!
Hello, thank you for this recipe! I am making it with Instapot and unclear what is meant by these directions: “pressure cook on high pressure for roughly 8 minutes …Then, quick release pressure after 5 minutes.” Is the total cook time then 13 minutes? Thank you!
Hi, usually you can set the specific setting for pressure cooking to be 8 minutes. Then you allow ‘natural release’ for 5 minutes (which is when the steam releases, so it’s somewhat still “cooking” but not fully) and then release the pressure through quick release after those 5 mins or else it can get mushy.
Hello Shruthi,
Thank you for this lively recipe.
Can you tell me if the nutritional values are for the whole recipe or a serving and how much would the serving be.
Hi, its per serving! This recipe makes about 6 servings total!
Very delicious and super easy to make! I grew up with my mom’s Indian cooking and missed this comforting dish when she stopped cooking due to dementia. It was nice to make it for her tonight! Thank you for sharing:)
Thank you Shruti! This Kitchari was so easy to prepare and sooo delicious. I did add a little garlic and some green onion.
Thank you for all the tricks and the guidance of options to add or subtract.
Hi,
It looks very delicious!
I was wondering, do the moong dahl have another name? They look like lentils, but when I google “moong dahl” mung beans pop up as a result. They look completely different, yours look like pretty little yellow split lentils, mung beans are green and shaped like a short tic-tac.
Hi Louise! Moong dal and moong bean are technically the same variety, but moong dal is the split and peeled mung bean, commonly used in various Indian dishes. You can find moong dal on Amazon or even at a lot of regular grocery stores (but definitely in an Indian store!) Hope that helps.
Thanks for the info and tip.
Could the “ordinary” whole mung beans be used for this recipe?
I don’t believe there are any Indian stores where I live, and there’re high shipping fees with Amazon, as I’m not in a country where Amazon has a branch.
No worries! Yes, you can use the mung beans for this recipe, but I would recommend soaking it for at least 15 minutes before you make the recipe (since they typically take longer to cook than the dal!) Let me know how it goes!
“ Add the the vegetables and sauté quickly. Then, add the rice and vegetables along with water and a pinch of salt. Bring all of this to a boil.”
Did u mean “add the rice and lentils…”?
Apologies, yes! That’s what I meant. I’ve fixed it.
Hi. This looks delicious, and I want to try it with brown rice in my Instant Pot. I have brown basmati and brown CalRose rice. Which of these rices would be best, and what would the timing be? Would I also need to increase the liquid?
Thank you in advance for your help.
Hi Pam – brown basmati rice should work in this recipe! Typically, with brown rice, I suggest soaking for 15 minutes, draining all that water, and then using that soaked rice to cook in the Instant Pot. I have found that high pressure for ~12 minutes works well. But depending on the age of the rice, you might want to cook up to 4-5 minutes longer. I suggest allowing natural pressure release after 12 minutes (or quick release after, say, 5-7 minutes). Hope this helps and hope you love it!
I loved the spice blend in this Indian porridge. It was the perfect comfort food for lunch.
I’ve been trying to learn a LOT more about Indian recipes, trying to identify spices and flavors by taste testing everything and really thinking about what I am tasting. I loved trying this kitchari out. I hadn’t had it before, but I loved how simple this recipe was to follow and that I could play with the spices as I was making it. Also, just taking a personal victory of not burning the rice (for a change)!
Hi, love this recipe so much, it’s so simple but yummy. Just one thing, what is an individual serving size? I assumed 2 cups for one person??
I usually do 1-2 cups!
I made this with fresh Swiss chard from my garden and it was so good! Thanks for the recipe, I’ll be making it again,
Hi, this was my first time making Kitchari and with your easy to follow instructions and helpful information, it turned out great. While this was the first time to make it, it certainly won’t be the last.
This is really easy to follow, loved this kitchari recipe! It’s really tasty and very flavorful! Will surely have this again! Highly recommended!
Hi Shruthi,
Thank you for the helpful recipe. Kitchari is often a favourite of mine!
One thing to mention though if I may?
Leftovers would probably be better eaten within 24 hours as apposed to within four days.
From personal experience and my more recent studies of Ayurveda, tamas really does begin to set in after the meal is prepared and whilst someone isn’t likely to get food poisoning from eating eating something a few days old, they’re also unlikely to feel energetic, clear and balanced either.
Just some food for thought for your fellow readers perhaps. I know it has been the case in my experience and Ayurvedic guidelines seem to indicate the same.
Best wishes.
Hi Warren – thank you so much, that’s a great point. The 4 days is more of a food safety consideration than an Ayurvedic one, but I can make a note in the recipe about the point you’ve raised. Many thanks.
I made this (instant pot version) without any veggies this morning because I wanted to taste the base flavors. I liked it very much although it definitely needs more salt and perhaps some heat for my palate. I will definitely make this again and will likely use Better Than Boullion vegetable stock rather than plain water. Thank you for making this simple to understand!
Hey Bob! Thanks for sharing and for taking the time to share the tips on using Better than Bouillon / more salt! The version as written is intended to also be used in cleanses / true to Ayurvedic form, so I typically adjust heat and salt myself too. I’ll add a note reflecting your comment, and thanks again for trying and sharing!
Thank you for this! I just made your recipe and it’s absolutely delicious. I added in greens and green beans from my garden for the veg and I’m excited to experiment with others next time!
Amazing! Greens and green beans are a great, nutritious addition!