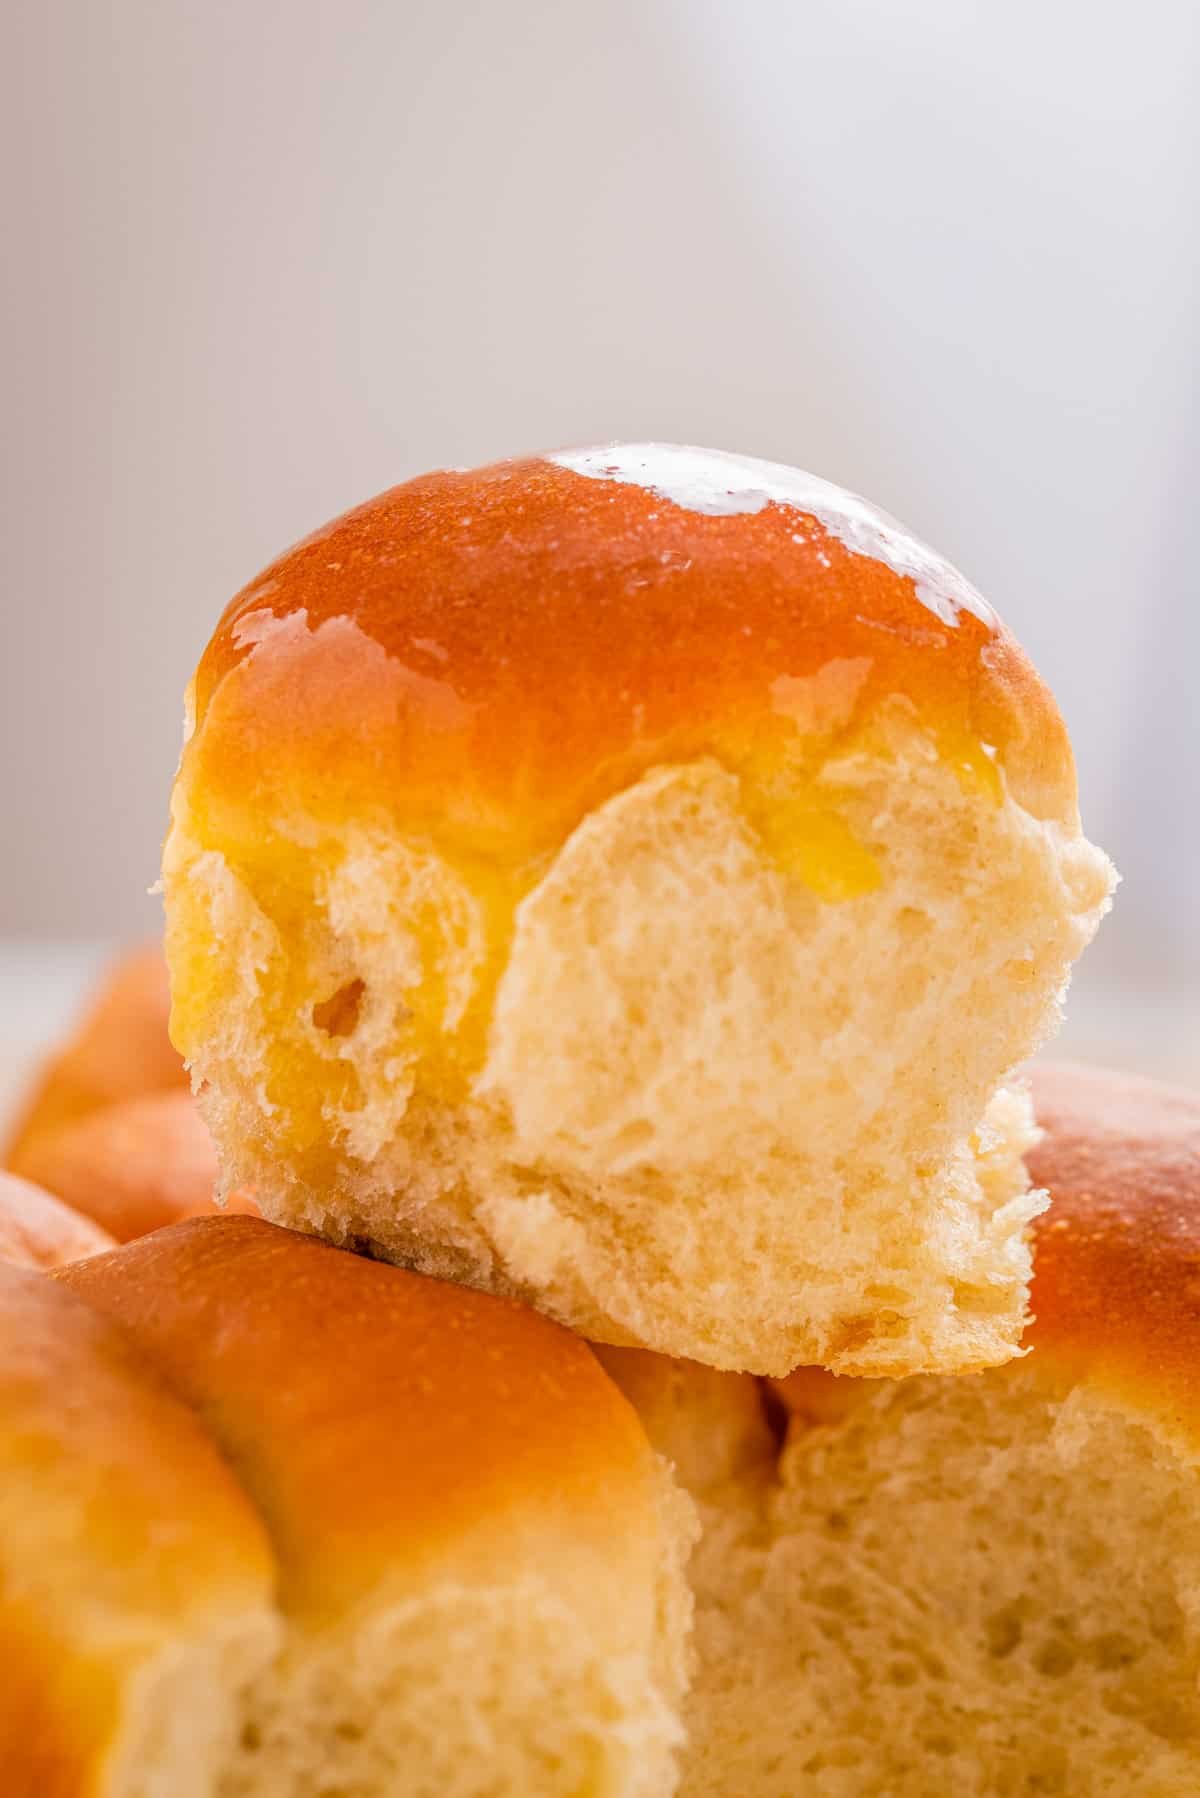
There’s something so nostalgic about dinner rolls – like Sunday family dinners at a favorite grandparents’ house. Made with a few simple ingredients, these dinner rolls are soft, fluffy, and oh-so satisfying. They are vegan as-written so everyone can enjoy them regardless of dietary restrictions. Trust me, once you’ve had these homemade dinner rolls, you’ll never buy store-bought again!
This post contains helpful tips and tricks! If you’re in a rush, please use the “Jump to Recipe” above!
💭 Why you’ll love this recipe
If you haven’t tried making vegan dinner rolls at home yet, I urge you to give them a try. You won’t be disappointed!
- Super versatile and easy for make-ahead. Dinner rolls are the perfect side dish for just about any meal. Serve them alongside a hearty stew for a comforting winter meal, or enjoy them with a fresh salad in the summer. They’re an easy way to make any meal feel extra special. Plus, they freeze well and can be reheated easily for a quick meal any time of day.
- Easy to make and vegan already! This recipe uses just six ingredients and comes together so easily, and vegan as written, so everyone can enjoy it regardless of dietary restrictions.
- Fluffy and delicious. They’re soft and fluffy on the inside with a slight crispy crust – basically, they’re perfection. This makes them the perfect vessel for all your favorite spreads and dipping sauces. Whether you’re into savory spreads like hummus or pesto, or sweet toppings like jam, there’s a perfect dinner roll out there for you.
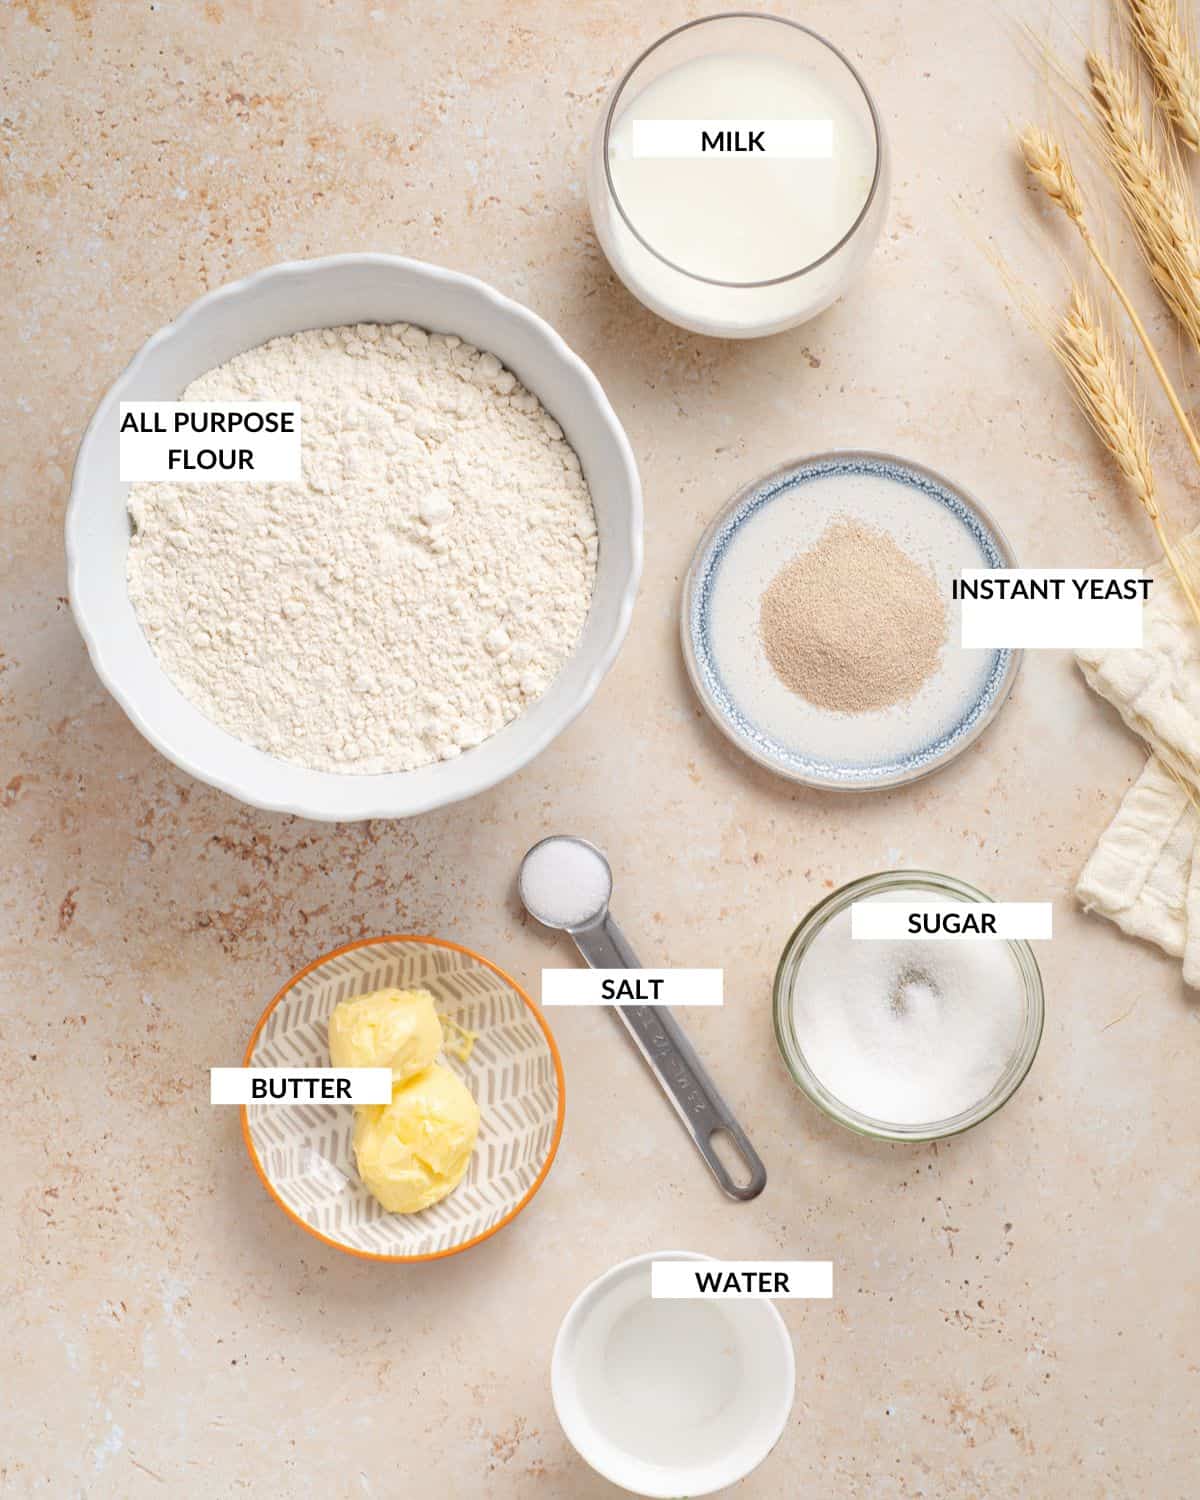
📋 Ingredients and notes
To make these dinner rolls, you’ll need all purpose flour, granulated sugar, fast action (instant) yeast, salt, regular or plant-based milk of choice, water and butter of choice (regular or vegan). I’m sure you have all of these ingredients at home already!
Notes and Variations
Dinner rolls need a rich dough, meaning a high amount of fat. Though this recipe only has six ingredients, each ingredient plays a critical role.
- Use almond milk or whole milk. Milk activates the yeast and produces the flavor and texture you love in dinner rolls. I’ve found that almond milk works best for a vegan version of this recipe. However, you can also use soy milk or oat milk. Make sure the almond milk is not flavored, and is unsweetened.
- Use instant yeast to cut down on rise time. You could use active dry yeast, but this will lead to a longer rise time. That said, the more you let the dough rise and punch it down, the better it’ll be in terms of fluffiness!
- Substitute all purpose flour. I’m a fan of soft and fluffy dinner rolls. But if you want chewier rolls, use bread flour, and if you want even fluffier rolls, you can substitute half the all purpose flour with “00” flour (which is an Italian finely milled flour that’s typically used in pasta and if you’ve never tried it before, hop on over here and get some immediately!)
You can try a few easy variations by adding some mix-ins with the flour:
- Cheese rolls – Add 1 cup of shredded hard cheese (regular or vegan!) I love making cheddar rolls (Daiya cheddar works great in this recipe!)
- Garlic rolls – Add 1 teaspoon of garlic powder to the flour (avoid fresh garlic since they often burn when in the oven)
- Herb rolls – Add 2 teaspoons of dried herb of choice (e.g., dried basil works fabulously – if you don’t have some on hand, learn how to dry basil easily)
📖 Make the fluffiest vegan dinner rolls!
Prepare the dough
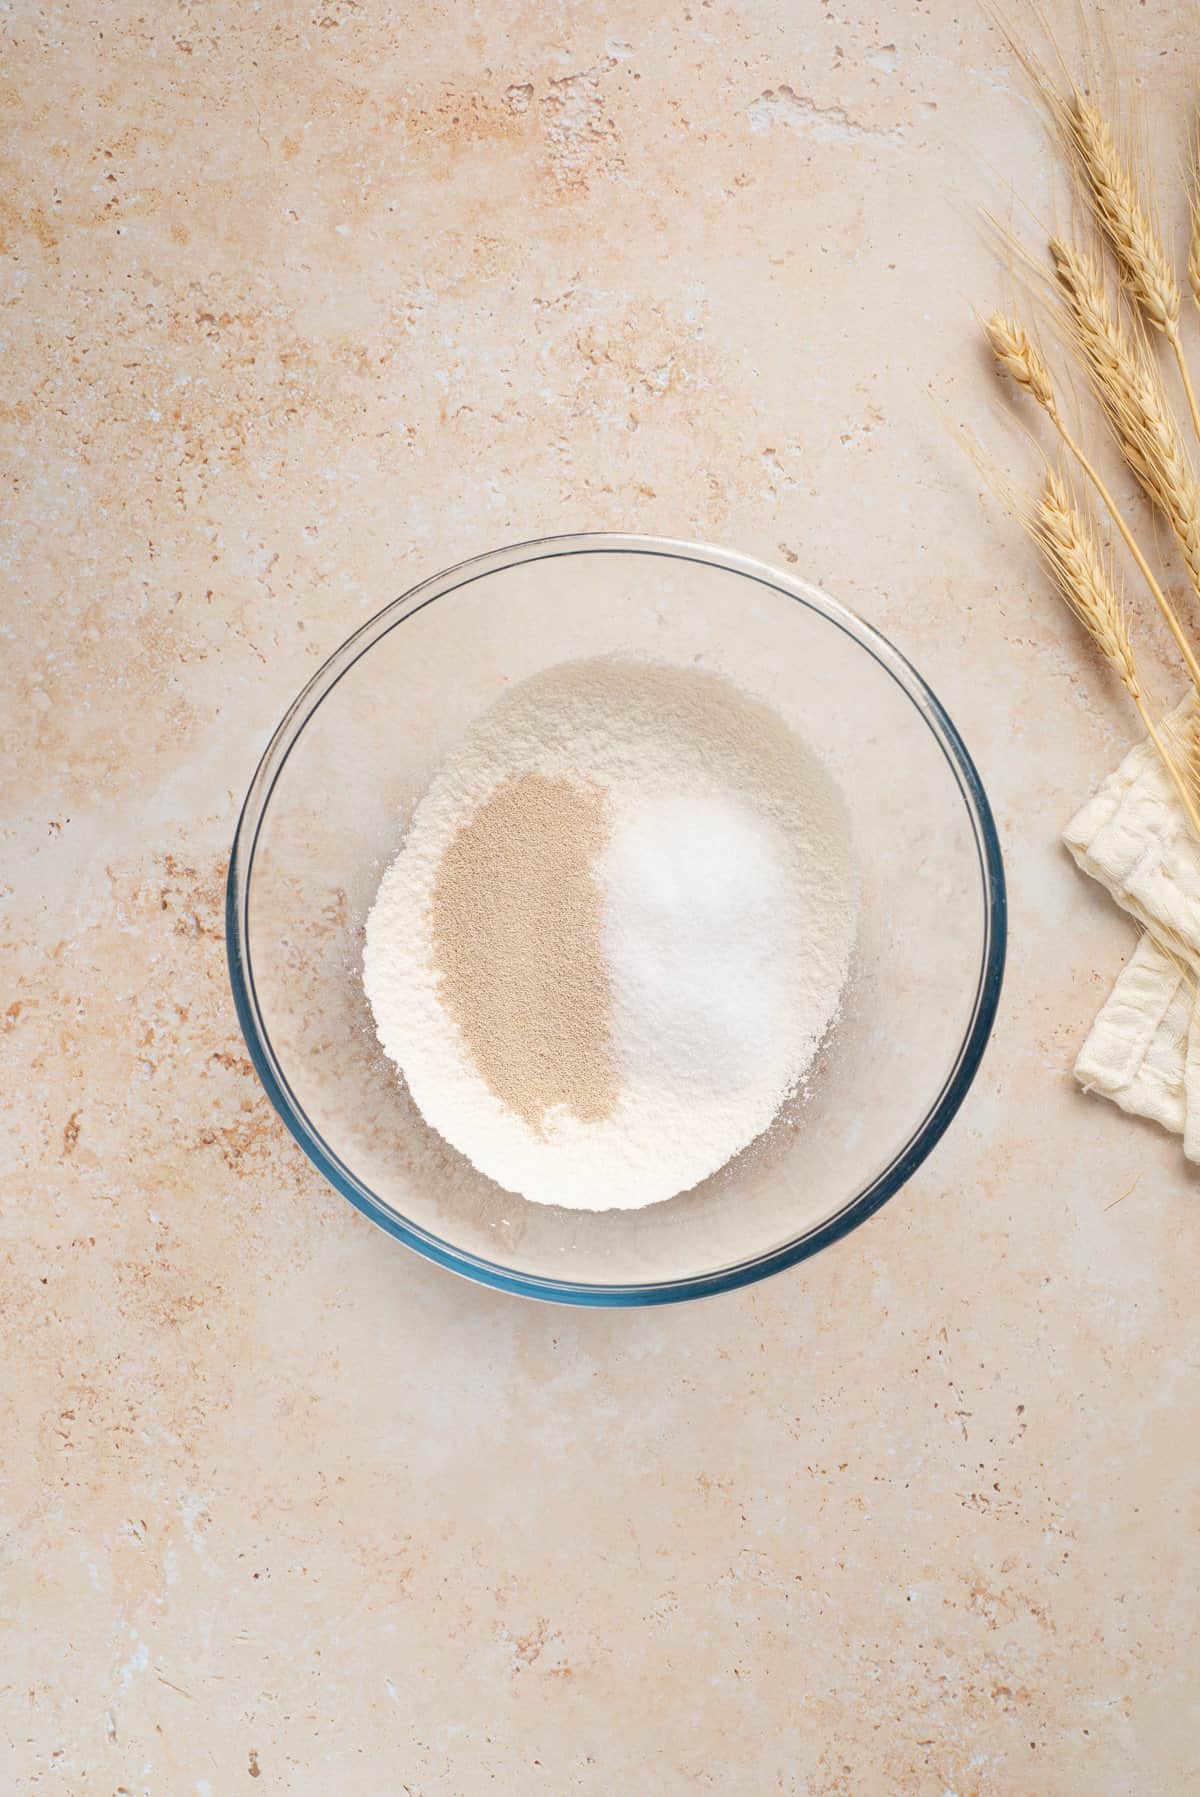
In a large bowl, combine sugar, fast action or instant yeast, and flour, and mix well with a fork. Reserve.
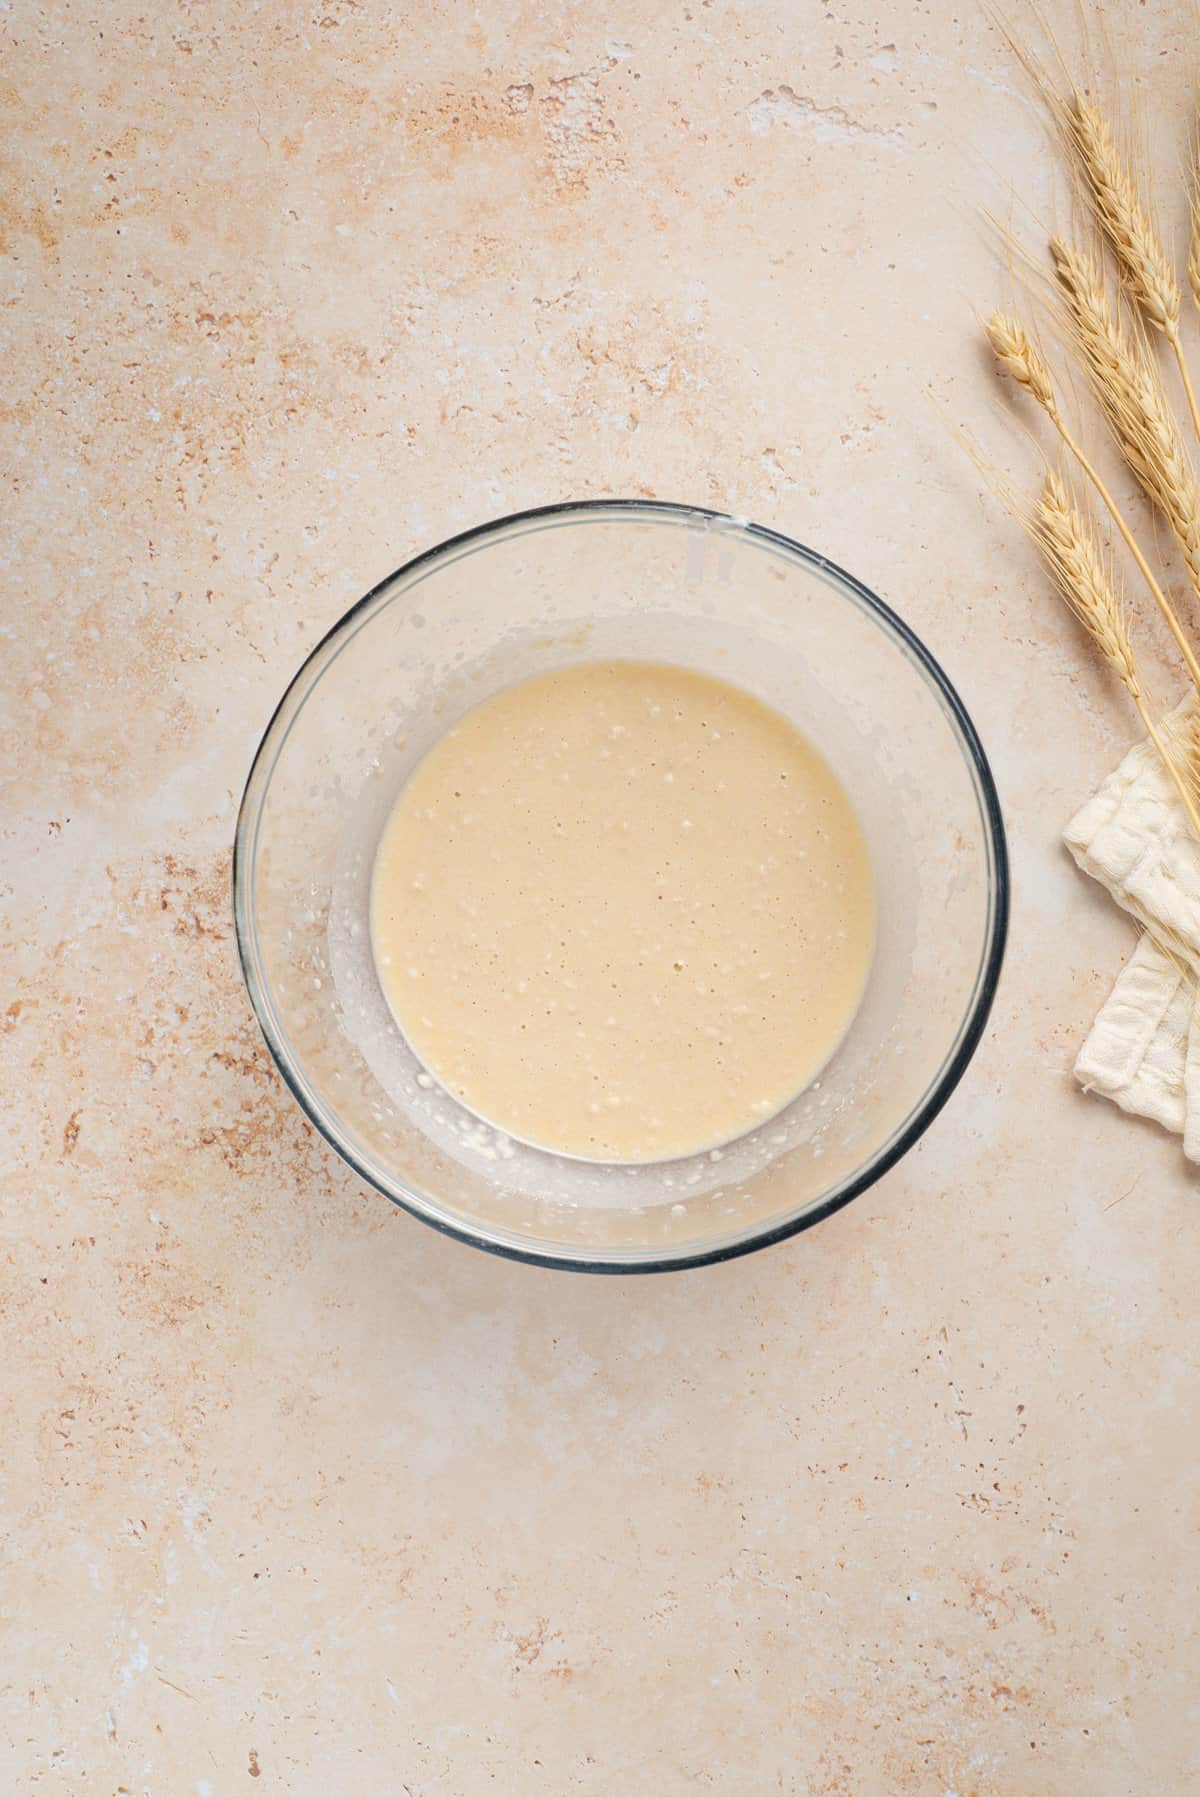
Lightly heat milk of choice (to about 110°F) along with water, and butter in a glass jar for 45 seconds in the microwave warm (make sure they are not too hot, otherwise the yeast will be killed!) Alternatively, bring the mixture to a gentle simmer until it barely starts boiling on the stove, and transfer it to another pot.

Pour the wet mixture over the dry ingredients.
With the help of stand mixer with the dough hook attached, beat for 2 minutes on medium speed, scraping the bowl as needed. Alternatively, use a silicone spatula and mix well until combined.
Add more flour as needed while beating, using enough of the remaining flour to make a soft dough (adding a little each time to prevent adding too much). Beat on high speed, for a further 2 minutes until a soft dough has formed.
Take the dough to a clean, lightly floured surface and work the dough with your hands until smooth and elastic, for about 7 to 8 minutes.
The dough should be slightly sticky to touch but not so sticky that it is sticking to your hands, or unworkable. If it is too sticky, add a few tablespoons of flour. But be careful not to add too much flour – this can make the rolls dense!
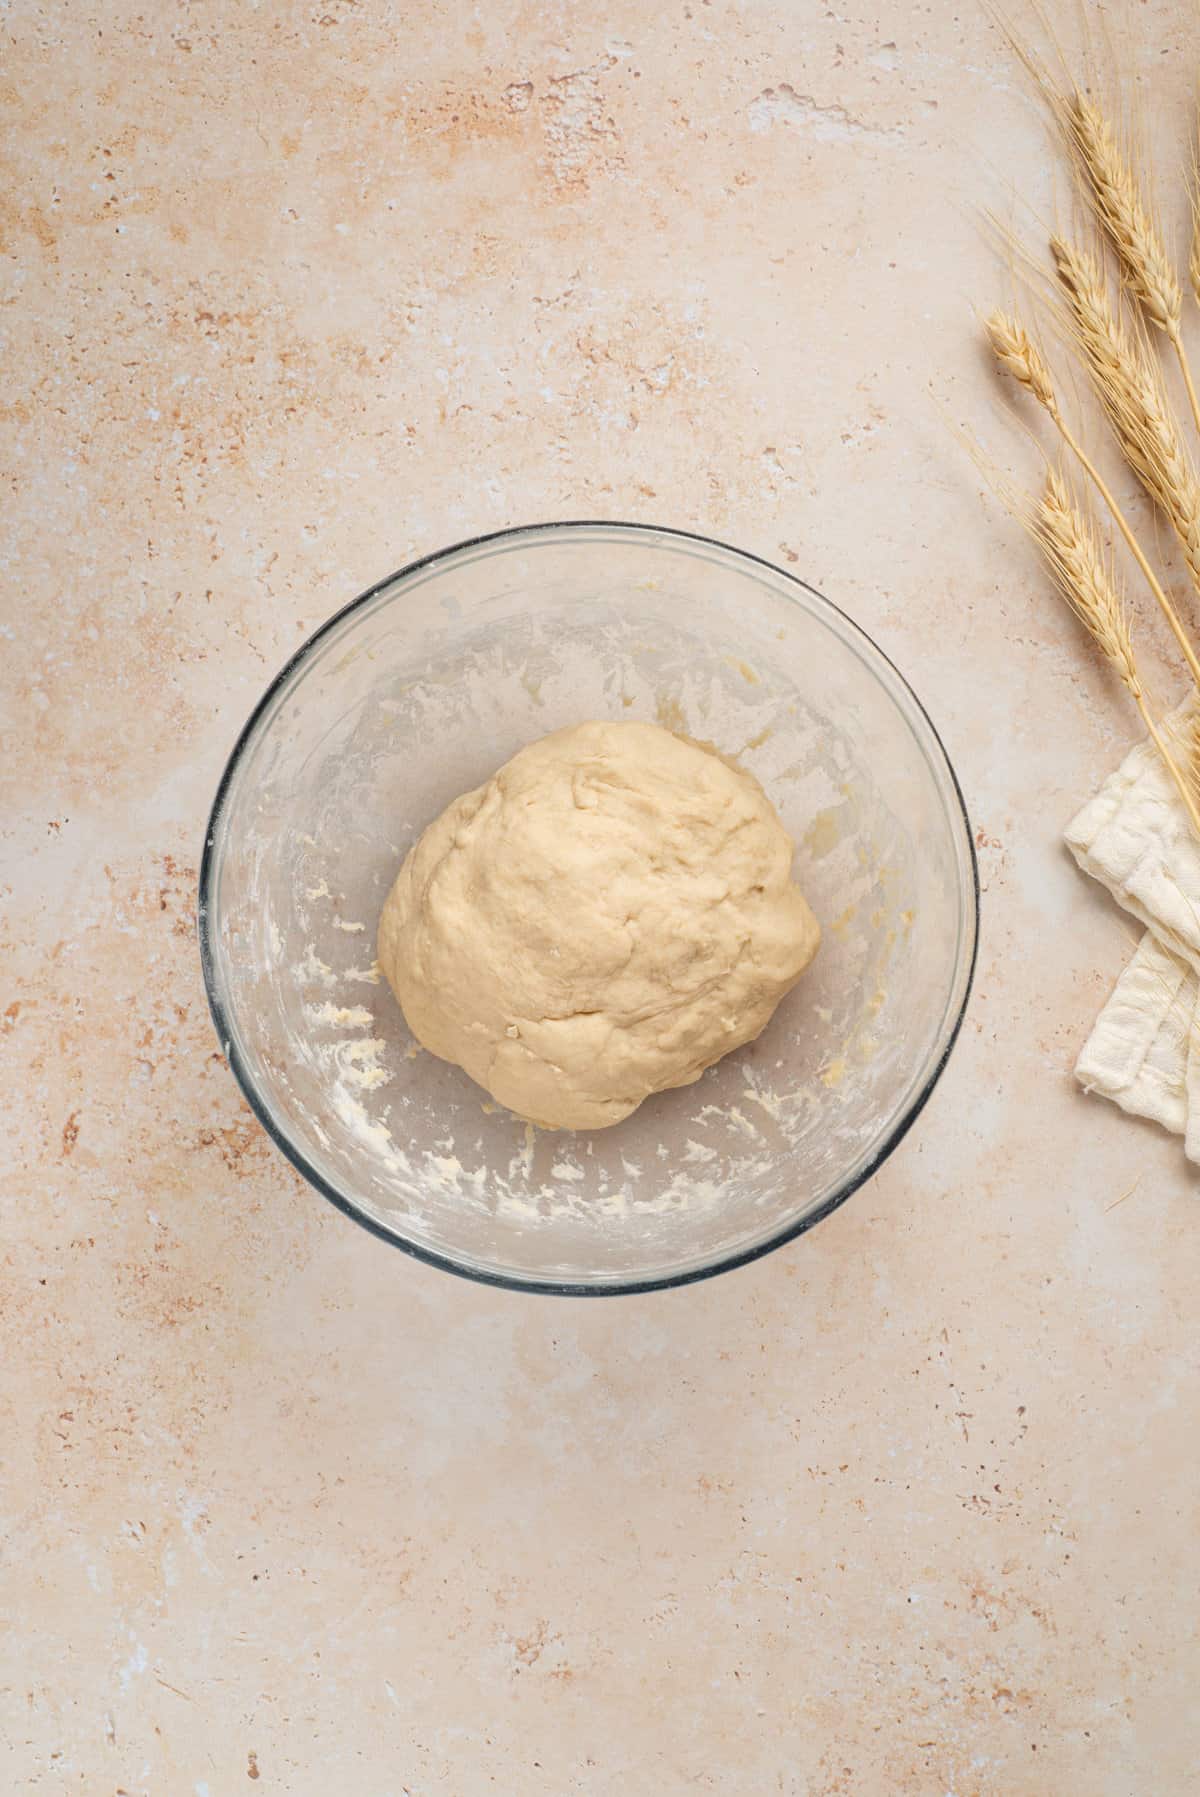
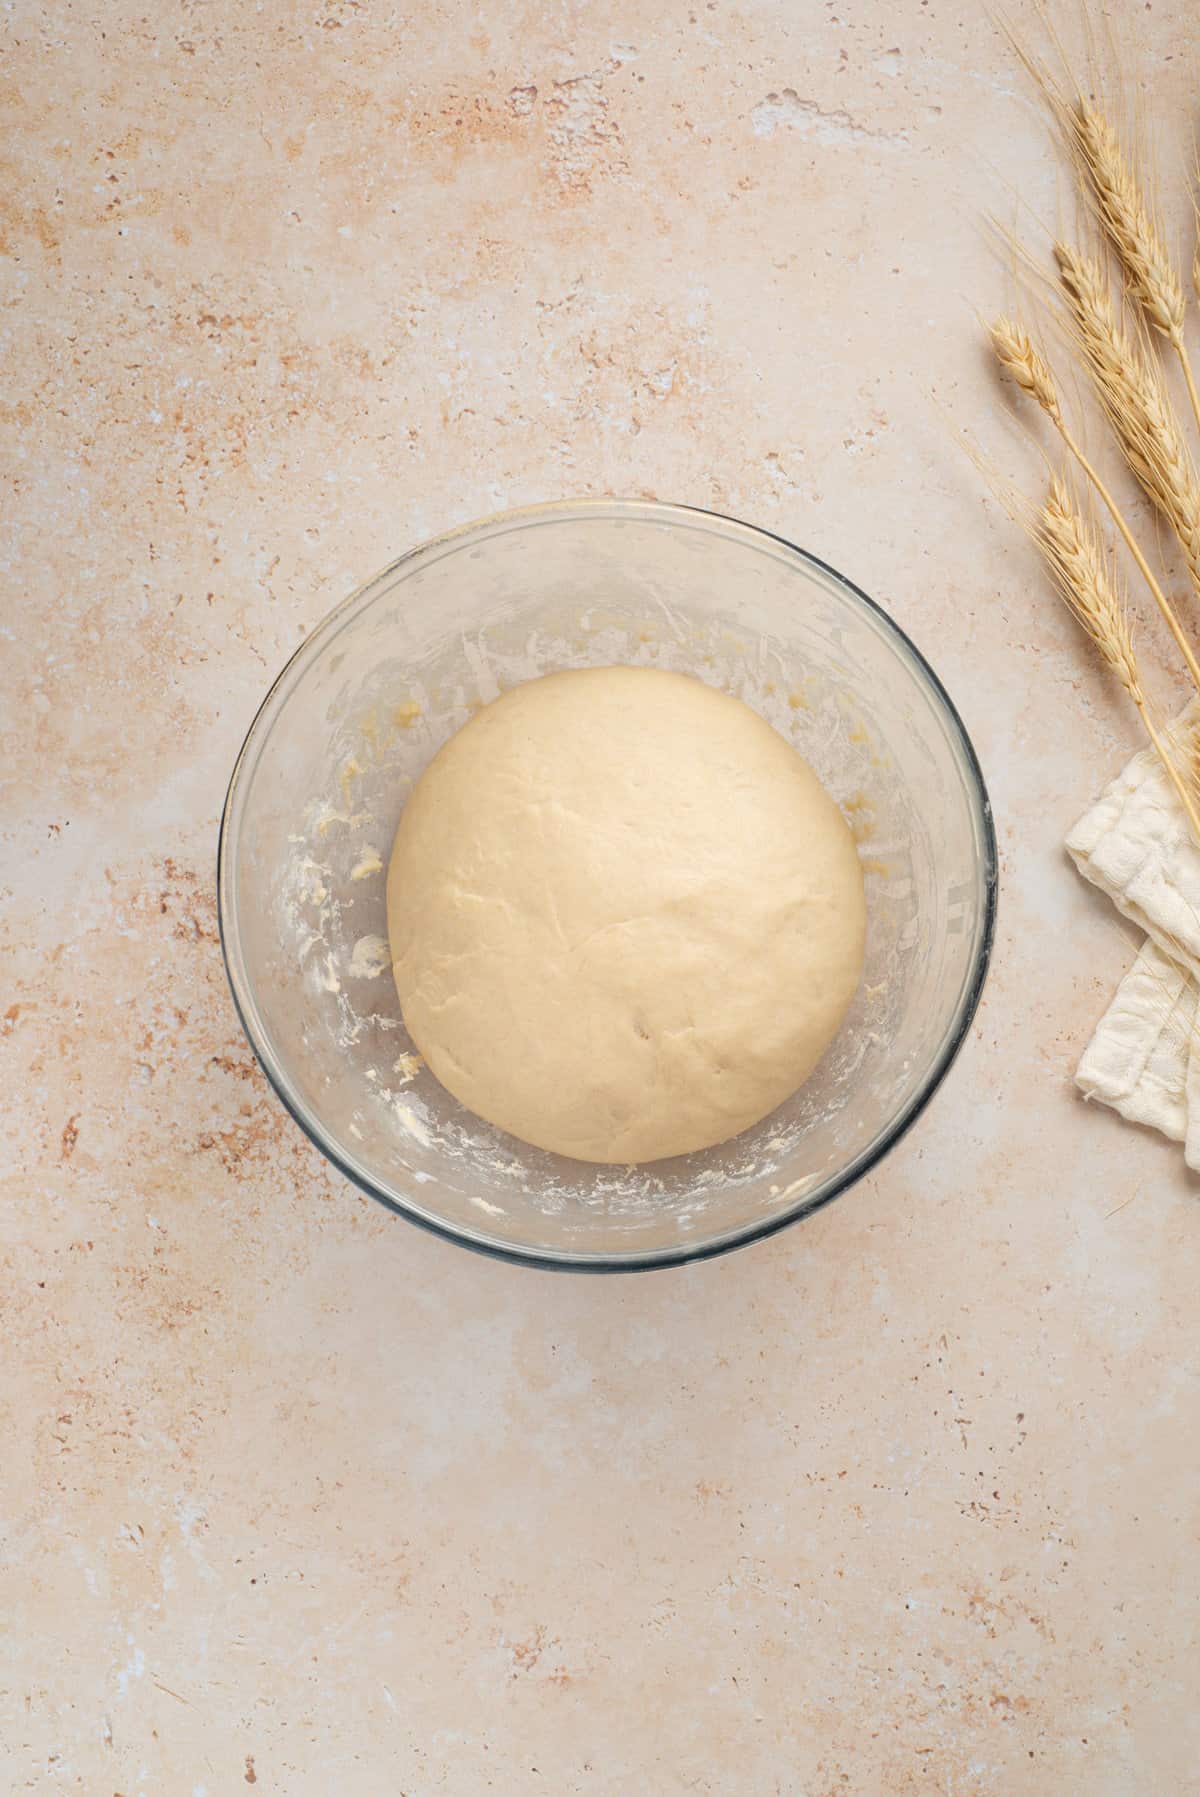
Put the dough back in the bowl, cover with a clean cloth and leave to rise at least 10 to 15 minutes in a warm place. Ideally, you allow it to rise as much as possible (I sometimes leave it for an hour!)
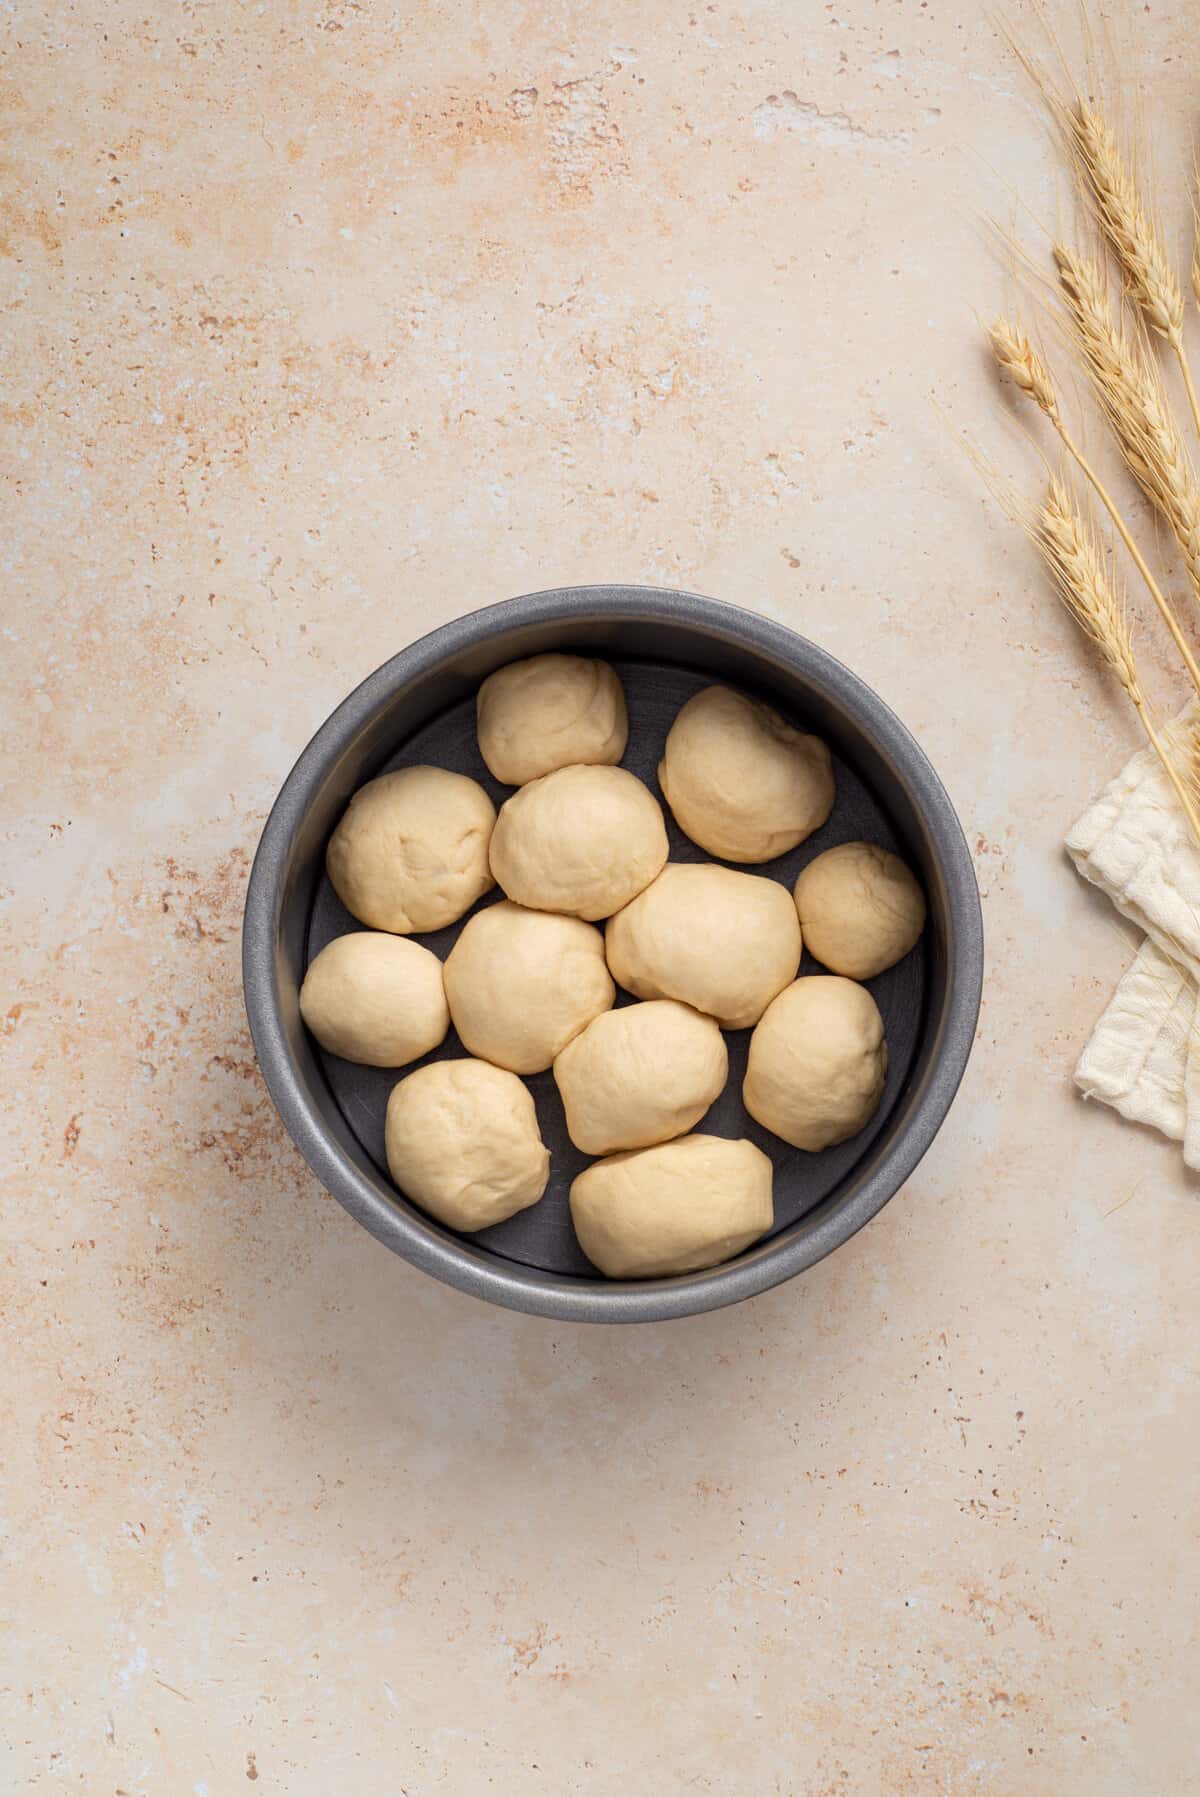
Preheat the oven to 375ºF / 190ºC.
Gently scrape the dough from the bowl and divide it into 12 equal balls. Place in a greased 8-inch, round, rectangular or square baking pan. Cover with the cloth and let it rise for an extra 15 to 20 minutes (or as much as possible).

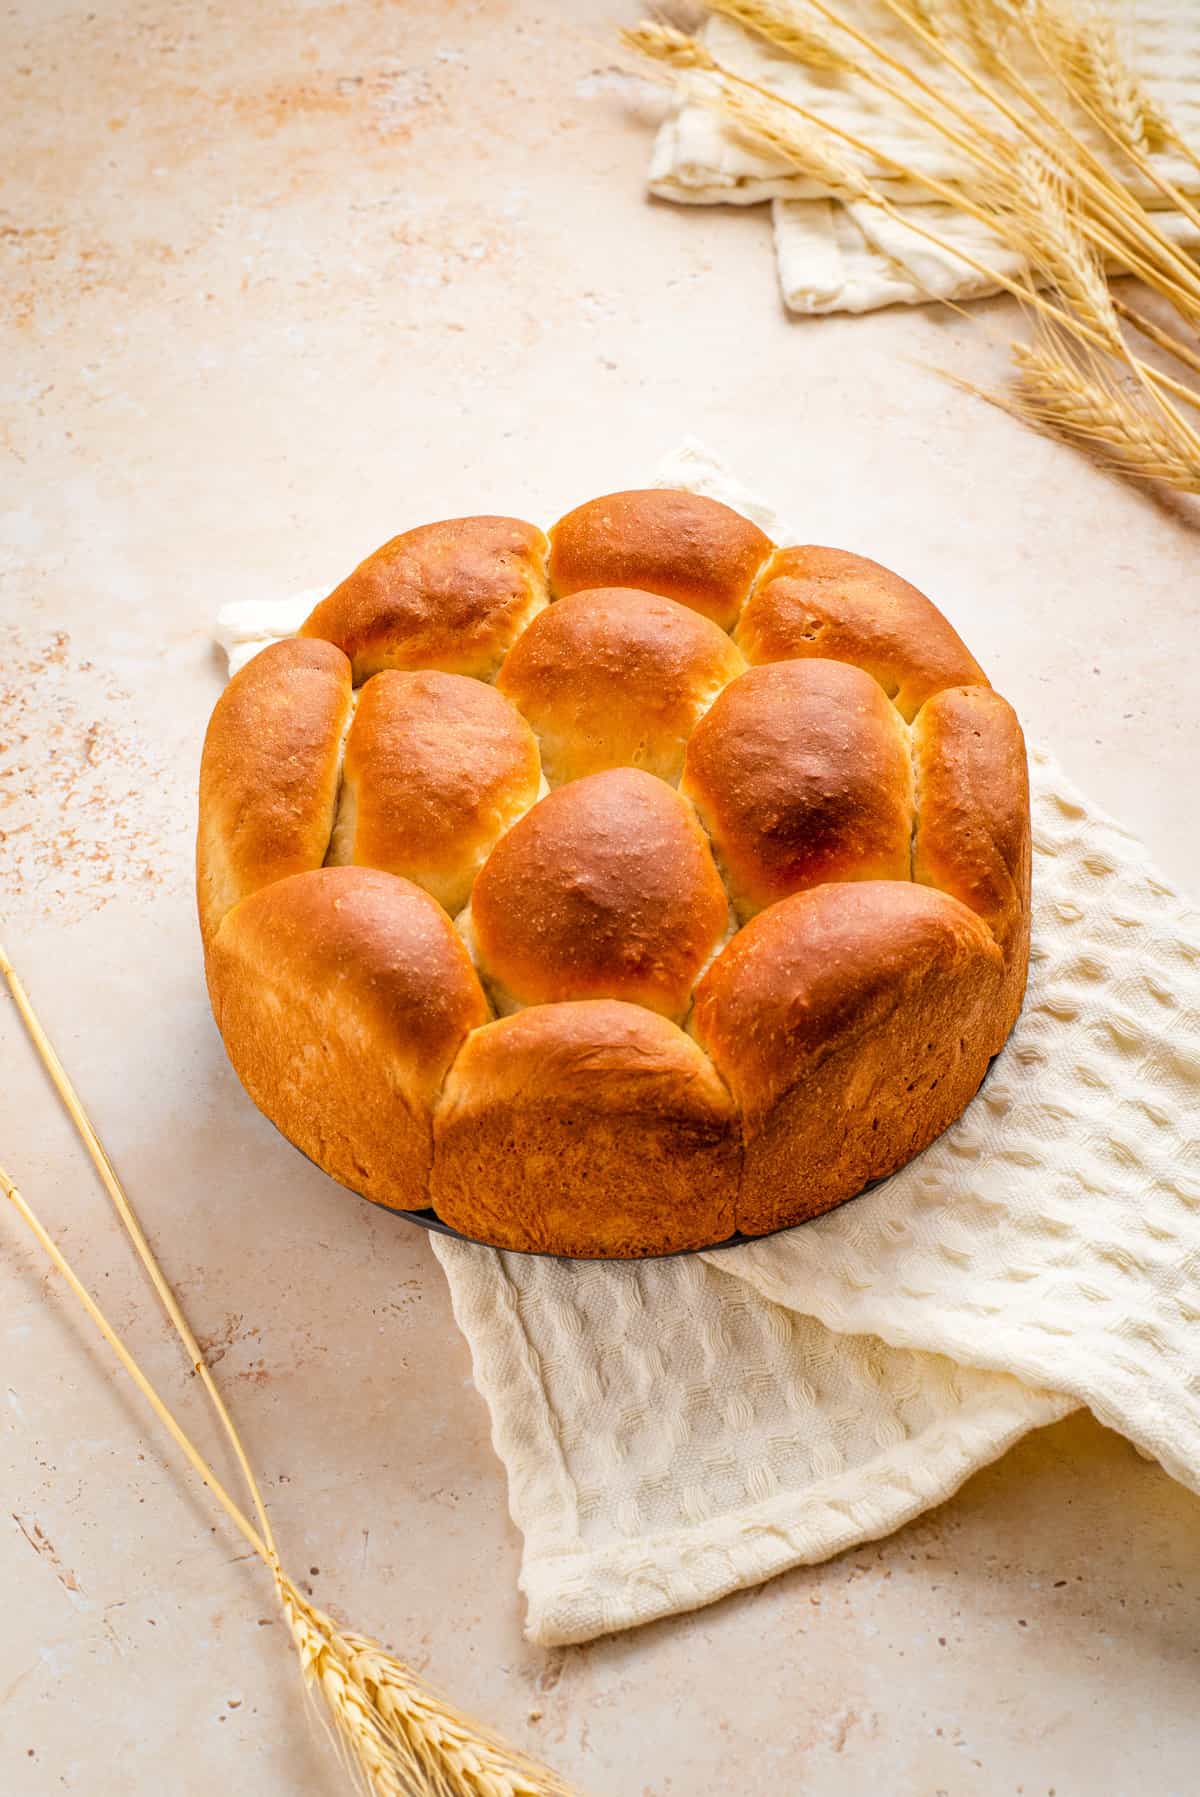
Bake the dinner rolls for 20 minutes. However, start checking them at 15 minutes to make sure they’re not too brown. If they are, then add some foil on top so they continue cooking but don’t burn. At 20 minutes, check one of the rolls in the center to make sure they’re done cooking.
Remove from the oven and leave to cool before removing from the pan, brush a little extra melted vegan butter on top and serve warm, maybe with some flaky salt. Enjoy your buttery soft dinner rolls!
👩🏽🍳Top tips and Troubleshooting FAQs
I have been making these rolls for years now, and I have a five top tips to make sure that you guys get these right every time!
- Make sure your milk is not too hot! This can kill the yeast and you won’t get any dough action. Lukewarm or warm milk (not hot!) is critical.
- Don’t skip the rise time, and allow as much as you can get! More rise time, the better. I have instructions for making this recipe the night before too. But allow at least 15-20 minutes (if not 30-60 minutes) for each rise. Make sure to cover the dish with the rolls really well and keep in a draft-free location.
- Account for ambient temperature. I live in Seattle, and the weather can get quite chilly here. So, if your kitchen tends to be cool, you’ll want to create a warm environment for the dough. If you want to do this, before you start mixing your ingredients, preheat your oven 200° F, and turn it off (or you can simply turn the oven light on without any preheating if you just need a little nudge). When you’re done kneading the dough, place it in a covered bowl in the warm oven. Make sure the oven is off before you place the dough inside!
- Portion and shape the rolls evenly. This ensures an even bake time. You don’t need to get your ruler, but making them roughly the same size helps.
- Check the rolls at 15 to 17 minutes. If they’re golden brown, that’s great; if they’re too dark, then cover the baking dish with some foil so they can continue cooking without burning.
Troubleshooting FAQs
Nope, absolutely not! Stand mixers make it a bit easier to knead, but my mom actually prefers kneading by hand. You’ll want to start mixing with a wooden or silicone spatula until you can’t knead with that anymore, and then show it some good tough love. Keep kneading until all the flour is incorporated – the dough will feel soft, very slightly sticky, but smooth.
Yes, you can, but just know that the rise time will be very different. Instant yeast can be added straight to dry ingredients, and rises a bit quicker. Active dry yeast is made of bigger yeast granules. So you first need to dissolve it in liquid, allow it to froth, and then add to the recipe. This leads to at least 10-15 minutes more rise time before you can make the dough.
For the first rise (i.e., before shaping) you’ll know that the dough has risen when it has roughly doubled in size (and boy, is it fun to punch it down!)
This is likely because of the yeast! Some brands of yeast tend to do this. I like Red Star Instant Yeast (it’s gluten free if you want to swap the all purpose flour with a gluten-free mix) or Fleischmann Instant Yeast
I recommend making two separate batches instead of doubling this particular recipe. I have found that the flavor and texture is more consistent that way.
Unfortunately, I have not tested this recipe with gluten free flour. However, I have had folks try to replace it with their favorite gluten-free baking mix and have been successful in the past!
🍴 Serving, storage and make-head suggestions
These delicious vegan dinner rolls will keep at room temperature, tightly wrapped, for 2 days. But let’s be honest, it’s usually gone right out of the oven. Absolutely make sure to brush the rolls with some butter of choice (I love using Country Crock Plant Butter)

Serve these fabulous rolls alongside:
- Your favorite soups (mine are creamy butternut squash or spicy pumpkin)
- Your favorite salads (mine has to be this garlic lemon kale salad)
- Any holiday meal (like this vegan turkey roast and vegan stuffing)
Make-ahead instructions:
The longer you allow the dough to rise, the better. Typically, when I am making these for a holiday dinner, I prepare the dough the night before, let it rise, shape them and place them in a baking dish. Then, I cover them tightly, and place them in the fridge overnight. Then, 3 hours before you’re ready to serve dinner, you can remove the rolls and allow them to rise on the counter. Bake an hour before serving.
Freezing instructions:
It’s so simple to freeze these naturally vegan dinner rolls! Once you have shaped the dough, place the rolls on a baking sheet, evenly spaced apart. Then, place them in the freezer to flash freeze (this prevents them from sticking to each other). Once frozen, place them in a freezer-safe bag.
To bake, take them out the night before you need to bake them, or at least 4-5 hours before, and then bake. You can also freeze baked dinner rolls!
If you like this recipe, check out my other easy, staple dinner sides:
[fsri image_class=”feast-image-round” id=”5968,11879,11234,7843″]
If you tried this recipe, don’t forget to comment and rate! ⭐⭐⭐⭐⭐

Vegan Dinner Rolls
Equipment
- 1 Stand Mixer optional
- 1 Hand Mixer optional
Ingredients
- 2 tablespoons granulated sugar
- ¼ ounce fast action yeast , 1 envelope
- ½ teaspoon salt
- 2 cups all purpose flour , divided, you may use less or more
- ½ cup milk of choice, regular or almond works great!
- ¼ cup water
- 2 tablespoons butter , regular or vegan, plus extra for brushing
Instructions
- In a large bowl, combine 2 tablespoons of sugar, 1 packet of fast action or instant yeast, ½ teaspoon of salt, and 1 ¾ cup of flour, and mix well with a fork. Reserve.
- Heat ½ cup milk of choice, ¼ cup of water, and 2 tablespoons of butter of choice in a glass jar for 45 seconds to 1 minute in the microwave until warm (make sure they are not too hot!) Alternatively, bring the mixture to a gentle simmer until it barely starts boiling on the stove, and transfer it to another pot.
- Pour the wet mixture over the dry ingredients.
- With the help of an electric mixer (stand or hand mixer) with the dough hook attached, beat for 2 minutes on medium speed, scraping the bowl as needed. Alternatively, use a silicone spatula and mix well until combined.
- Use enough of the remaining flour to make a soft dough (adding a little each time to prevent adding too much) – up to ¼ cup of flour – while beating, on high speed for a further 2 minutes until a soft dough has formed. The dough will feel slightly sticky, but not stick to your hands or feel unworkable.
- Take the dough to a clean, lightly floured surface and work the dough with your hands until smooth and elastic, for about 7 to 8 minutes.
- Put the dough back in the bowl, cover with a clean cloth and leave to rise for 10 to 15 minutes in a warm place. The dough should rise about ¼ to ½ of its size at least (but longer the rise time, the better!) See notes for more details.
- Preheat the oven to 375ºF / 190ºC.
- Gently scrape the dough from the bowl and divide it into 12 equal balls.
- Place in a greased 8-inch, round, rectangular or square baking pan. Cover with the cloth and let it rise for an extra 15 to 20 minutes. Again, longer the better! See notes for make-ahead instructions to maximize overnight rise time.
- Bake the dinner rolls for 20 minutes. However, start checking them at 15 minutes to make sure they're not too brown. If they are, then add some foil on top so they continue cooking but don't burn. At 20 minutes, check one of the rolls in the center to make sure they're done cooking.
- Remove from the oven and leave to cool before removing from the pan, brush a little extra melted butter on top and serve warm. Enjoy your buttery soft dinner rolls!
Notes
- Butter and Milk: I have used Country Crock plant butter and almond milk in this recipe, but you can use butter and milk of your choice!
- Make sure your milk is not too hot! This can kill the yeast and you won’t get any dough action. Lukewarm or warm milk (not hot!) is critical. P.S., Make sure your yeast isn’t expired!
- Don’t skip the rise time, and allow as much as you can get! More rise time, the better. I have instructions for making this recipe the night before too. But allow at least 15-20 minutes (if not 30-60 minutes) for each rise. Make sure to cover the dish with the rolls really well and keep in a draft-free location.
- Ambient Temperature: The temperature of your home will affect the time to raise your dinner rolls. If making this recipe on a cold day, preheat your oven to the lowest setting for 5 minutes, turn it off just to be warm and place the dough inside to rise. If it gets too hot, open the oven door and leave it to cool down a bit, we want a comfortable warm oven, not hot! Alternatively, if you need just a little heat, just turn the oven light on.
- Portion and shape the rolls evenly. This ensures an even bake time. You don’t need to get your ruler, but making them roughly the same size helps.
- Check the rolls at 15 to 17 minutes. If they’re golden brown, that’s great; if they’re too dark, then cover the baking dish with some foil so they can continue cooking without burning.
Nutrition
Nutrition information is automatically calculated, so should only be used as an approximation.


Thank you for the tip about the almond milk. My son is allergic to dairy and this worked a treat. The rolls are so fluffy and soft, we loved the consistency. Great recipe!
These are fluffy and delicious dinner rolls! They are perfect to serve on the side of any dinner, but I love them most with pot roast to sop up the gravy!